Trigger Nodes
A customer messages your WhatsApp number at midnight, a partner system posts a new loan application, a supplier drops an invoice into your shared drive — each of these should start an agent, automatically. Triggers are the nodes that decide when and from where an agent run starts.
This page covers every trigger in the picker and each of its settings, how files reach your agent, and how to test a trigger before you go live. You'll need an agent open on the canvas — see Canvas Basics if you haven't built one yet.
How triggers work
Open the node picker and choose Triggers. Each trigger is its own entry — there's no generic trigger with a type dropdown, so you pick the one you want:
| Trigger | Starts a run when… | Group |
|---|---|---|
| Phone Call | a call comes in on one of your phone numbers | Channels |
| SMS | an SMS arrives on one of your numbers | Channels |
| an email arrives in one of your inboxes | Channels | |
| a WhatsApp message arrives on one of your numbers | Channels | |
| Web Chat | a visitor writes in the chat widget on your website | Channels |
| Webhook | an external system calls a URL | — |
| Schedule | a schedule you set comes round (e.g. every weekday at 9 am) | — |
| Internal Event | something happens elsewhere in your workspace (a conversation ends, an agent escalates…) | — |
| Knowledge Base | a file is added to a Knowledge Base folder | — |
| Folder Watch | a new file lands in a watched OneDrive / SharePoint, Google Drive or S3 folder | — |
| Sub-Workflow | another agent calls this one as a tool | — |
| Manual Test | you click Execute | — |
A trigger has no input — nothing runs before it — and its output connects to the rest of the agent, usually an AI Agent. On the canvas each trigger shows a short subtitle so you can read the agent at a glance: On inbound email, On webhook, On schedule, On KB file added.
One agent, many triggers. You don't change a trigger's channel — you add the trigger you need. To serve web chat, WhatsApp and email with one set of conversation logic, add all three triggers and connect each to the same AI Agent (use the + on the AI Agent's left edge — What triggers this?).
Every trigger's properties modal has the usual Config, Settings and Notes tabs. Its Input pane just says Workflow entry (nothing comes before a trigger), and its Output pane lists the variables it hands on — for example trigger_type, channel, customer_id, subject and attachments.
Channel triggers — Phone Call, SMS, Email, WhatsApp
These start a run on inbound traffic to one of your business contacts — the phone number, email address or WhatsApp number a customer writes to or calls.
Business Contact. Pick the number or inbox from the dropdown. The list comes from the providers you've connected on Connections (for example Plivo for phone, SMS and WhatsApp, or Microsoft 365 for email); click Reload after adding one. If a contact is already used by another agent, the dropdown says so — each business contact routes to exactly one agent. If the list is empty, connect that provider first.
Replies need a sender
A channel trigger decides what starts the agent. For the agent to reply on SMS, email or WhatsApp, also connect the matching Email Sender, SMS Sender or WhatsApp Sender to the AI Agent's Action port. Without one, the builder shows a warning and the agent reads the message but sends nothing back on that channel. Phone and web chat reply in the call or the widget itself. See Sender Nodes.
Email filters
The Email trigger can narrow which emails start a run:
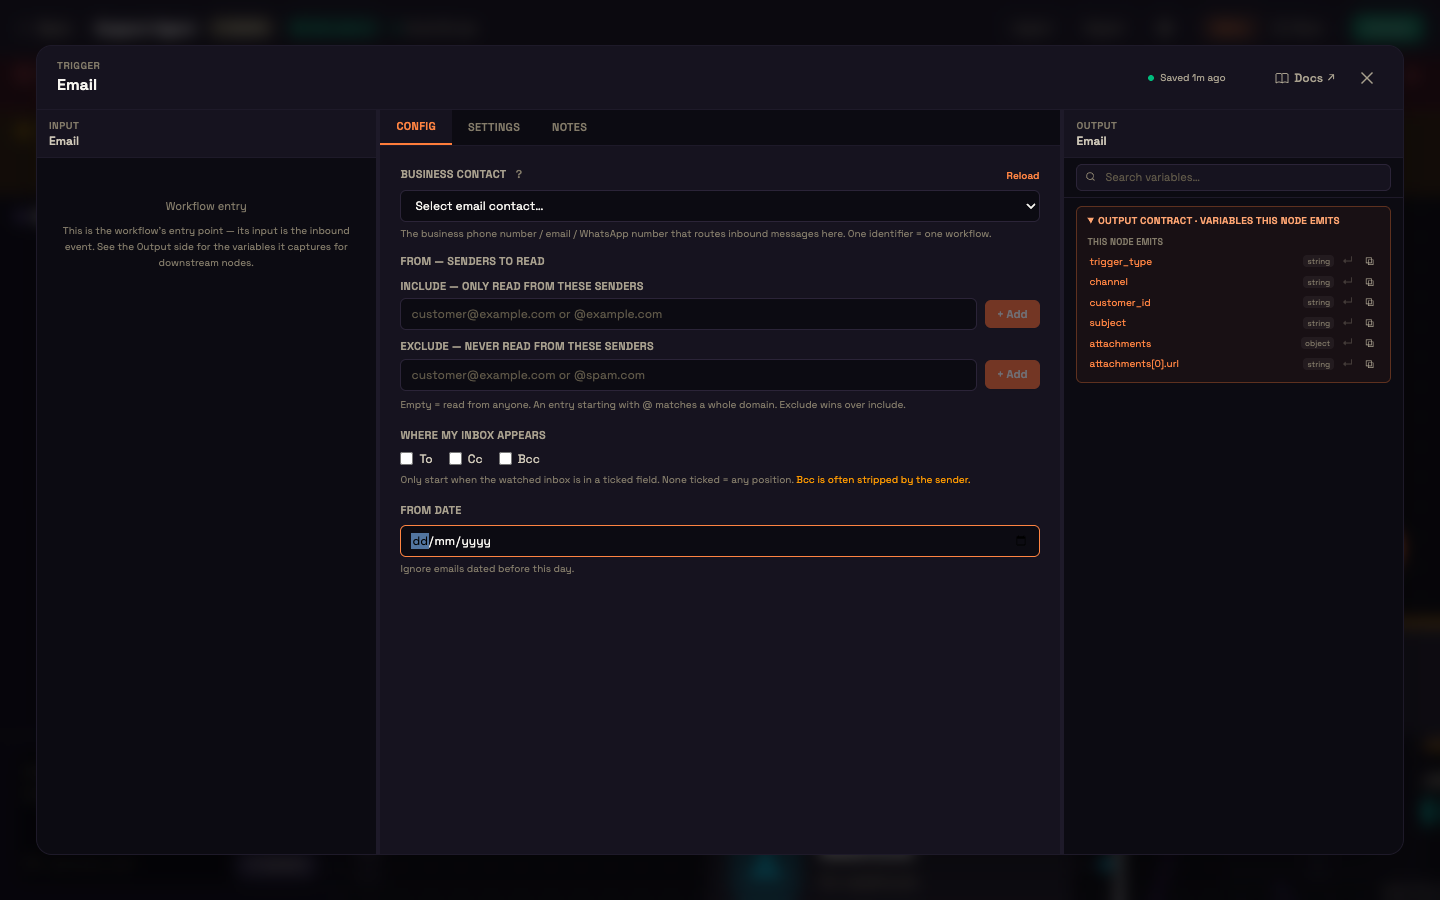
| Setting | Effect |
|---|---|
| Include — only read from these senders | Only emails from these addresses start a run. An entry starting with @ matches a whole domain (@acme.com). |
| Exclude — never read from these senders | Emails from these addresses are ignored. Exclude wins over include. Empty lists mean anyone. |
| Where my inbox appears — To / Cc / Bcc | Only start when your inbox is in one of the ticked fields. None ticked = any position. (Bcc is often stripped by the sender.) |
| From date | Ignore emails dated before this day. |
A filtered-out email is ignored completely — no conversation, no reply.
Caller / sender filters
Phone Call, SMS and WhatsApp triggers have the same idea for numbers:
| Setting | Effect |
|---|---|
| Include — only these callers / senders | Only these numbers start a run. An exact number (+919876543210) matches that caller; a prefix (+91) matches every number that starts with it. |
| Exclude — never these callers / senders | These numbers are ignored. Exclude wins over include. |
An Include list blocks callers with no caller ID. To allow anonymous callers while blocking a few numbers, use Exclude only. A filtered call is hung up; a filtered message is dropped.
Inbound files (attachments)
When a trigger fires with files — an email with PDFs, a WhatsApp or SMS media message, a web chat upload, a webhook file, or a new file from Folder Watch or a Knowledge Base folder — every file is available to later nodes as trigger.attachments, one entry per file:
{{ trigger.attachments[0].url }}[0] is the first file, [1] the second, and {{ trigger.attachments }} is the whole list. Each entry has:
| Field | Meaning |
|---|---|
url | A temporary link to the file (valid for 24 hours). |
file_name | The original name, e.g. invoice.pdf. |
mime_type | e.g. application/pdf. |
file_size | Size in bytes. |
source | Where it came from: media (email / WhatsApp / SMS), upload (web chat), webhook, folder_watch, or kb. |
The AI Agent already reads the file
The AI Agent automatically receives each file's content. Use trigger.attachments[].url when a node needs the file itself — a Document Processing node to extract fields, or an HTTP Request to forward it.
If the agent pauses — waiting for a person, say — and resumes later, the links are refreshed on resume, so a file step after the pause still gets a working URL.
Example. Asha at Acme Diagnostics adds an Email trigger for the billing inbox, wires it to a Document Processing node with the Invoice / AP preset, and sets its input to {{ trigger.attachments[0].url }}. When a supplier emails an invoice PDF, the run fires, the node pulls out the header fields and line items, and a Condition routes it to the right approver — no manual download.
Web Chat trigger
The Web Chat trigger puts a chat widget on your website. There's no business contact to pick: visitors arrive through the widget, and your embed code ties it to this agent.
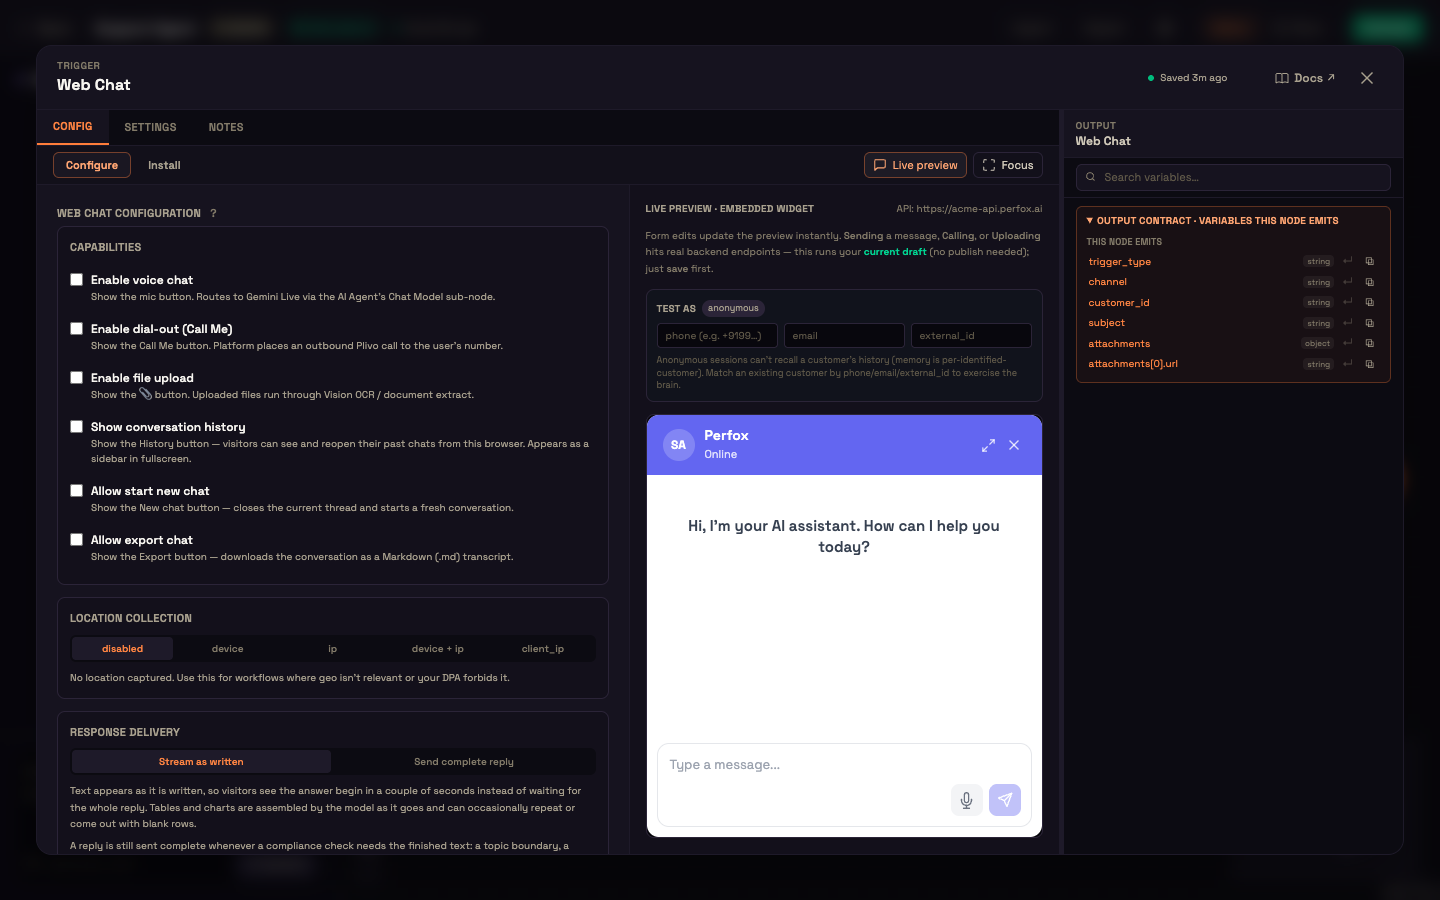
Its Config tab has two views — Configure (how the widget behaves) and Install (how to put it on your site) — plus a Live preview button and a Focus button that widens the panel.
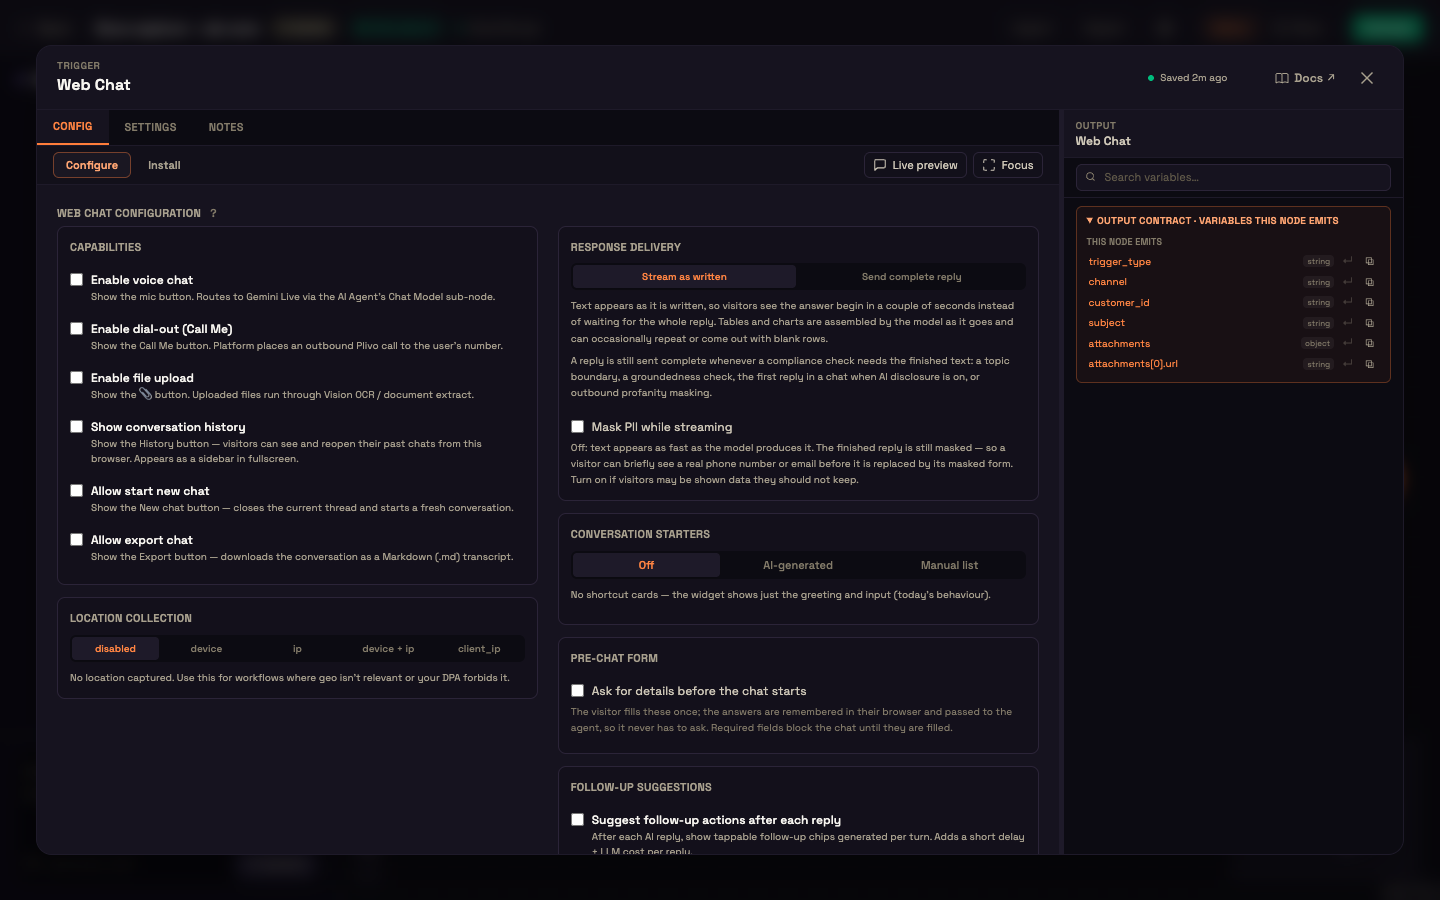
Capabilities
These switches decide which buttons the widget shows. All are off until you turn them on.
| Switch | Shows | Needs |
|---|---|---|
| Enable voice chat | A mic button that starts a live voice conversation with the agent. | A voice model on the AI Model part. |
| Enable dial-out (Call Me) | A Call Me button that phones the visitor's number. | A connected voice-calling provider (Plivo). |
| Enable file upload | A 📎 button; uploads are read with document and image extraction. | An image / vision model on the AI Model part. |
| Show conversation history | A History button listing the visitor's past chats so they can reopen one (a sidebar in fullscreen). | — |
| Allow start new chat | A New chat button that closes the current thread and starts fresh. | — |
| Allow export chat | An Export button that downloads the conversation as a Markdown (.md) transcript. | — |
When voice chat is on, choose a voice mode:
| Voice mode | Behaviour |
|---|---|
| Nova animation (default) | Like a phone call — the agent speaks everything — but the widget shows an audio-reactive animation instead of the live transcript. Pick an Animation style: Cloud (default), Radial, Circle or Bars. |
| Voice call | Like a phone call — the agent speaks everything and nothing else appears on screen. |
| Copilot (Beta) | The agent speaks a short answer and shows cards, tables and charts in the chat. |
Reopening the widget always restores the visitor's current conversation — see User Context & Identity.
Location Collection
| Option | Behaviour |
|---|---|
| disabled (default) | No location captured. |
| device | Browser location (the visitor is asked for permission). |
| ip | A silent lookup from the visitor's IP address. |
| device + ip | Try the browser first, fall back to IP if the visitor declines. |
| client_ip | The visitor's browser looks up its own IP location. |
Response Delivery
| Option | Behaviour |
|---|---|
| Stream as written (default) | The answer appears word by word, so visitors see it start within a couple of seconds. Tables and charts are assembled as the reply is written and can occasionally repeat or show blank rows. |
| Send complete reply | The whole reply arrives at once. |
A reply is always sent complete when a compliance check needs the finished text (a topic boundary, a groundedness check, the first reply when AI disclosure is on, or profanity masking).
Mask PII while streaming — off by default. The finished reply is always masked, but while streaming a visitor could briefly see a phone number or email before it's replaced. Turn this on if visitors might be shown data they shouldn't keep.
Conversation Starters
Shortcut cards on the welcome screen that give a visitor something to tap before they type.
| Setting | Effect |
|---|---|
| Off / AI-generated / Manual list | Off (default) shows just the greeting and the input box. AI-generated writes cards for you. Manual list uses cards you write — each has the text shown on the card and, optionally, the message sent when it's tapped. |
| Greeting | Replaces the persona's greeting on the welcome screen. Use {persona_name} to insert the persona's name. |
| Subtitle | A line under the greeting. |
| Input placeholder | The hint text in the message box. |
| Business context (AI-generated) | A short hint that steers the generated cards, e.g. "we sell EVs in Bengaluru". |
| How many cards | 3–8, default 6. |
| Personalize for returning visitors | Tailors generated cards to a returning, identified customer. |
Pre-chat Form
Tick Ask for details before the chat starts to show a short form before the chat opens. The visitor fills it once; the answers are remembered in their browser and passed to the agent, so it never has to ask.
- Give the form a title, subtitle and button label (default Start chat).
- Pick the fields: name, email, phone and external id, plus any field listed under Information to collect on the connected AI Agent. Each field can have its own label and placeholder, and you can reorder them.
- Required fields block the chat until they're filled. For fields that come from the AI Agent, "required" follows the agent's own setting, so the form and the agent always agree.
Follow-up Suggestions
Tick Suggest follow-up actions after each reply to show tappable follow-up chips after every answer (How many chips: 2–5, default 3). Each reply takes slightly longer and costs a little more.
Live preview
Click Live preview to open a working widget beside the settings. It runs your current draft — no activation needed — so you can chat, try voice, and upload files. Every change you make to the settings shows in the preview straight away.
Test as lets you preview as a known customer: enter a phone number, email or your own customer id to match an existing customer (an anonymous visitor can't see a customer's history).
Install
The Install view puts the widget on your website.
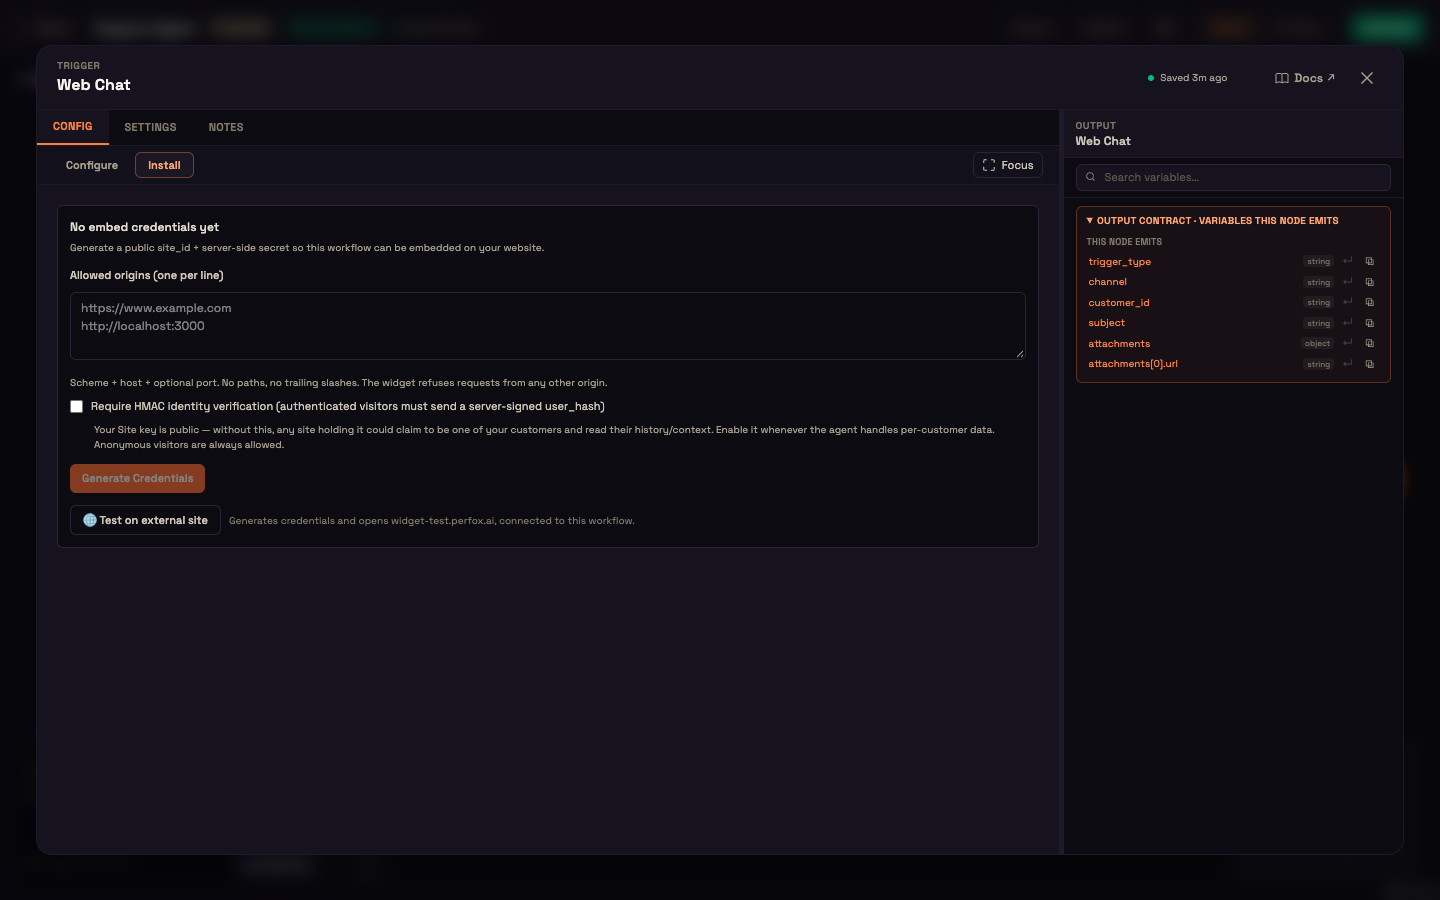
- Allowed origins — list the sites allowed to load the widget, one per line (scheme + host + optional port, no paths — e.g.
https://www.acme.com). The widget refuses requests from anywhere else. - Require HMAC identity verification — turn this on whenever the agent handles per-customer data. Your site key is public, so without it any page holding the key could claim to be one of your signed-in customers. With it, a customer identity is trusted only when your server has signed it. Anonymous visitors are always allowed.
- Click Generate Credentials. You get:
- the API host and public Site key for your embed code, and ready-to-paste snippets for HTML, React, Vue and Server (Node.js);
- a secret for signing visitor identities — shown once, so save it before closing the dialog;
- a secrets table with Rotate and Revoke now. Rotating keeps the old secret working for a grace window you choose (5 minutes to 7 days, default 24 hours); the last working secret can't be revoked — rotate first.
- After credentials exist, the Install view also holds:
- Appearance — Display name (defaults to the persona name), Avatar URL, Primary color, Bubble position (bottom right / bottom left), Default open (open the chat on page load), and Start fullscreen;
- Client-side UI commands — let the agent drive your page (navigate, highlight, prefill a form…), limited to the event names you allow;
- a Danger zone to Suspend embedding (the widget refuses new conversations until you resume) or Delete credentials.
Test on external site generates credentials and opens a test page connected to this agent. It runs the activated agent — use Live preview to test a draft.
For the embed code itself, identity signing and the full command list, see Embed Script Reference and Identity Verification (HMAC).
Webhook trigger
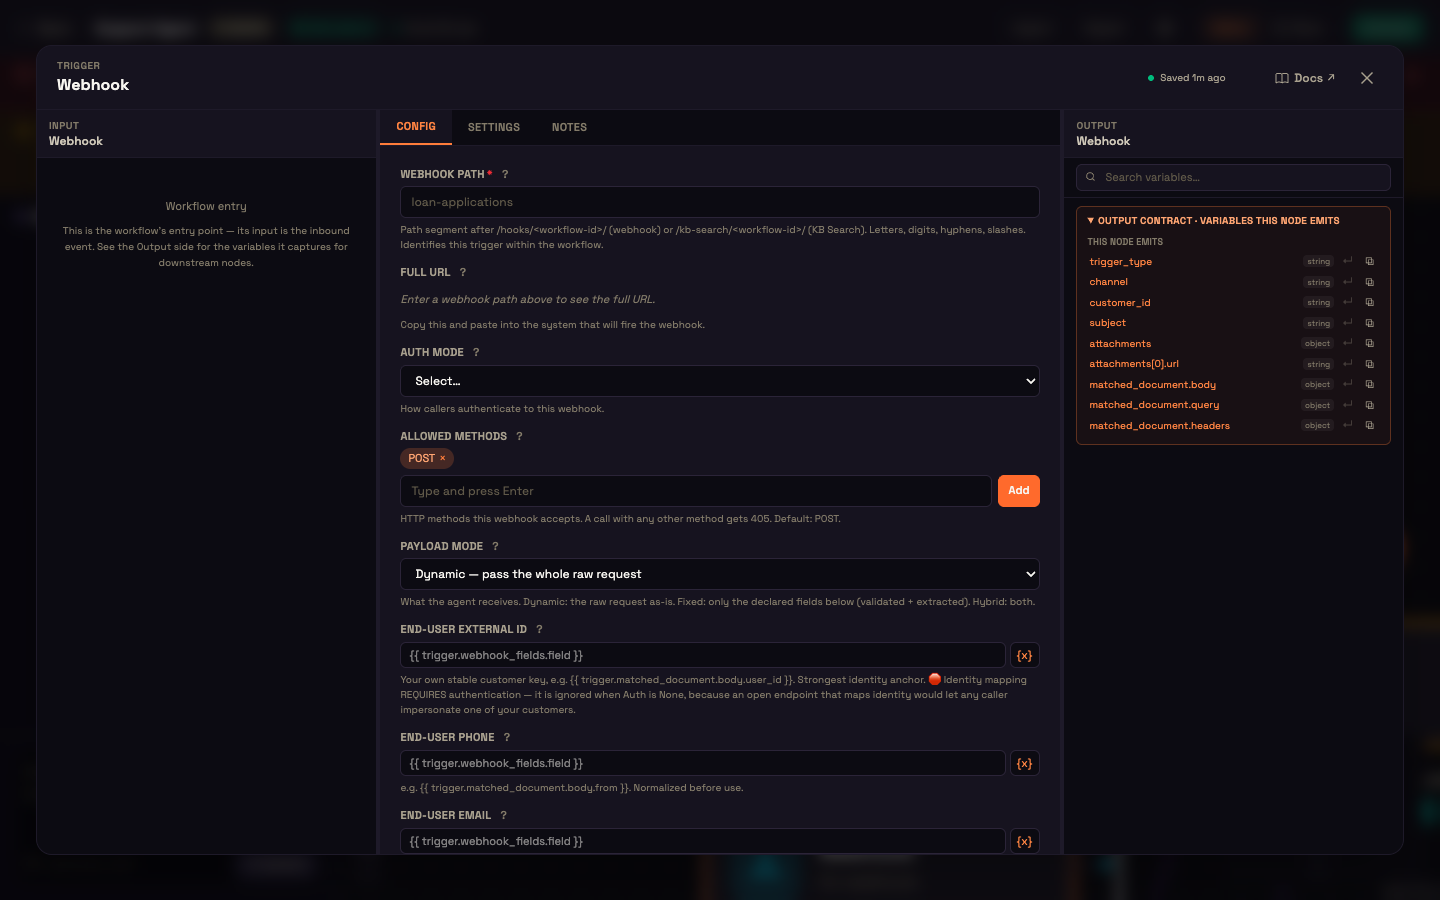
The Webhook trigger turns any external system — a CRM, a payment gateway, a form, your own app — into something that can start the agent by calling a URL.
Settings
| Setting | Default | Effect |
|---|---|---|
| Webhook Path (required) | — | The last part of the URL, e.g. loan-applications (letters, digits, hyphens, slashes). |
| Full URL | — | The complete URL to give the calling system, with a copy button. Appears once you enter a path. |
| Auth Mode | None | None — anyone with the URL can call it. Shared Secret — the caller sends the secret in the X-Webhook-Secret header (or Authorization: Bearer …). HMAC SHA-256 — the caller signs the raw body and sends the hex signature in X-Webhook-Signature (X-Signature and GitHub-style X-Hub-Signature-256 with a sha256= prefix also work). |
| Auth Secret | — | Appears for the two secret modes. Generate creates a strong random secret. |
| Allowed Methods | POST | Which HTTP methods are accepted; any other method gets 405. |
| Payload Mode | Dynamic | Dynamic — the agent gets the whole request. Fixed — only the fields you declare, checked and extracted. Hybrid — declared fields plus the whole request. |
| Expected Payload Fields | — | For Fixed and Hybrid. Each field has a name (what later nodes see), an optional JSON path into the body (e.g. data.order.id), a type (string, number, boolean, object or array), required, and an optional validation pattern. A missing required field or a type/pattern mismatch returns 400. |
Later nodes read the request as {{ trigger.matched_document.body }}, .query and .headers, and declared fields as {{ trigger.webhook_fields.<name> }}. Auth and other sensitive headers are removed before the agent sees them.
Bridging your own channel — end-user identity
By default a webhook run has no customer: it's an anonymous system run, and the agent is simply told a request arrived. That's right for a CRM hand-off, but not if you're bridging a channel of your own — your own WhatsApp gateway, an IVR, a partner inbox. For that, map where the customer's details live in your payload:
| Field | Example | Effect |
|---|---|---|
| End-user External ID | {{ trigger.matched_document.body.user_id }} | Your own stable customer key — the strongest anchor. |
| End-user Phone | {{ trigger.matched_document.body.from }} | Finds or creates the customer by phone. |
| End-user Email | {{ trigger.matched_document.body.email }} | The same, by email. |
| End-user Name | {{ trigger.matched_document.body.profile_name }} | Display name. |
| End-user Message Text | {{ trigger.matched_document.body.message }} | The person's actual message becomes the agent's turn. |
| Attachment URL | {{ trigger.matched_document.body.media.url }} | A file the caller links to instead of uploading; it's fetched so the agent reads its contents. |
| Report as channel | WhatsApp / SMS / Email / Phone / Web | A label passed to your integrations so they can tell a bridged message from, say, a scheduled run. Perfox still sends no automatic reply on that channel — your bridge replies itself. |
Anything that comes out empty is skipped. Once the customer is recognised, the run continues their existing conversation — which is how a bridged channel shares history and memory with web, phone and email. Map the External ID where you can: an HTTP request has no caller ID of its own, and your own key is the most reliable anchor.
Identity mapping and Attachment URL need authentication
With Auth Mode: None, anyone with the URL could name one of your customers and talk to the agent as them, or make Perfox fetch any URL. So when auth is None, identity mapping and Attachment URL are ignored and the run stays anonymous. Use Shared Secret or HMAC SHA-256.
Getting the reply back
From the response. An authenticated webhook answers with the agent's reply in the response body:
json
{
  "received": true,
  "execution_id": "01a06f91-…",
  "response_text": "Your order PX-4471 ships tomorrow.",
  "attachments": []
}
Your gateway posts the customer's message and delivers whatever comes back in response_text. On an open (auth None) webhook, response_text is left out.
Or call yourself back. If delivery needs to be asynchronous or carry your own correlation key, add an HTTP Request node after the agent that posts the reply to your gateway and echoes the key from the payload you received. A non-2xx answer is passed on to the next node rather than failing the run, so you can branch and retry.
What the caller gets back
| Status | Why |
|---|---|
200 { execution_id } | Accepted — the run has started. |
| 400 | A required field is missing, or a type / pattern check failed. |
| 401 | The secret or signature doesn't match. |
| 404 | The agent doesn't exist or isn't active. |
| 405 | The HTTP method isn't in Allowed Methods. |
| 422 | The active agent is incomplete (for example no AI Model or Personality), so it's refused rather than run badly. |
Checks run in that order — active, method, auth, then completeness — and uploaded files are only saved after auth passes, so a rejected call never stores anything.
Schedule trigger
The Schedule trigger runs the agent on a timetable — reminders, follow-ups, nightly reports — without waiting for a customer to write first.
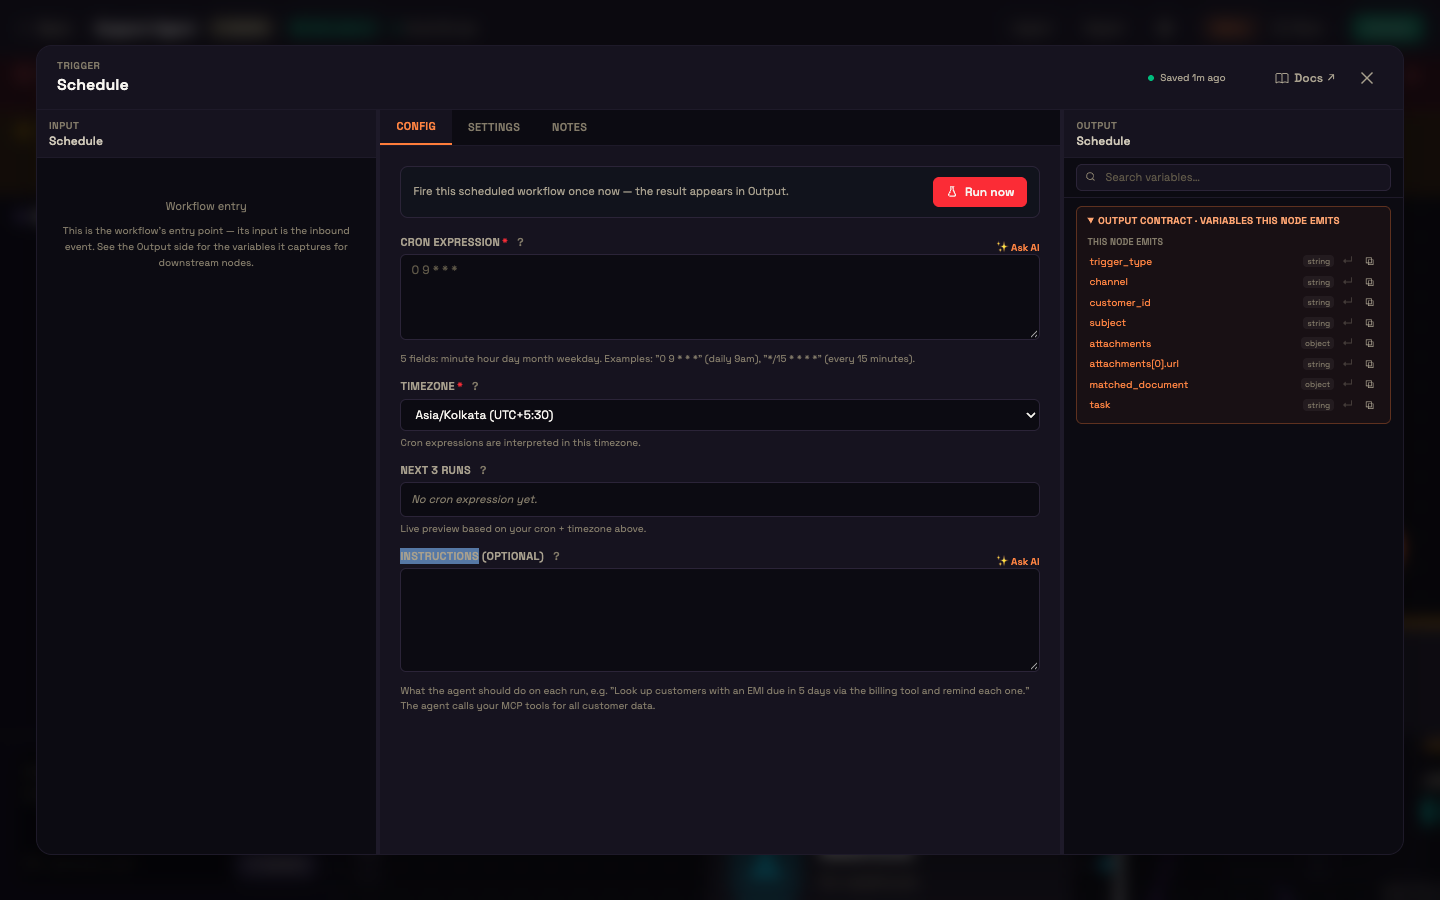
| Setting | Effect |
|---|---|
| Cron Expression (required) | Five fields: minute, hour, day, month, weekday — e.g. 0 9 * * * (daily at 9 am) or */15 * * * * (every 15 minutes). ✨ Ask AI turns a plain-language description ("every weekday at 10:30") into the expression. |
| Timezone (required) | The timezone the schedule follows (default Asia/Kolkata). |
| Next 3 Runs | A live preview of the next three times it will fire, so you can check the pattern as you type. |
| Instructions (optional) | What the agent should do on each run, e.g. "Look up customers with an EMI due in 5 days and remind each one." Also has ✨ Ask AI. Keep customer data out of here — the agent gets it from your integrations. |
Run now at the top of the panel fires one run immediately; the result appears in the Output pane.
When you Activate the agent, the schedule starts. Deactivating or deleting the agent stops it.
Internal Event trigger
The Internal Event trigger starts a run when something happens elsewhere in your workspace — so one agent can react to another.
| Setting | Effect |
|---|---|
| Event Type (required) | Pick or type the event. Suggestions: conversation.completed (a conversation ended), conversation.escalated (handed off to a human), kb.synced (a Knowledge Base folder finished re-syncing), workflow.stage.completed (another agent finished a stage), and agent.escalated (an AI agent escalated to a human). |
| Event Filter (optional) | A JSON object; the run starts only when every key matches the event. Leave empty to match any event of that type. |
Knowledge Base trigger
The Knowledge Base trigger runs the agent once per file added to a Knowledge Base folder — so your team keeps uploading as usual, and each new document is processed automatically.
| Setting | Effect |
|---|---|
| KB Folders (required) | The folders to watch — choose Root for the whole knowledge base. Files added to any folder inside a selected one count too. |
| Fire When | File is indexed (ready to search) (default, recommended) or File is uploaded (immediately) — before it's searchable. |
Use it to summarise, extract, notify or route whenever new documents arrive. New uploads are picked up without editing the agent.
Folder Watch trigger
The Folder Watch trigger watches a folder in your own cloud storage and runs the agent when a new file lands there — no Knowledge Base involved.
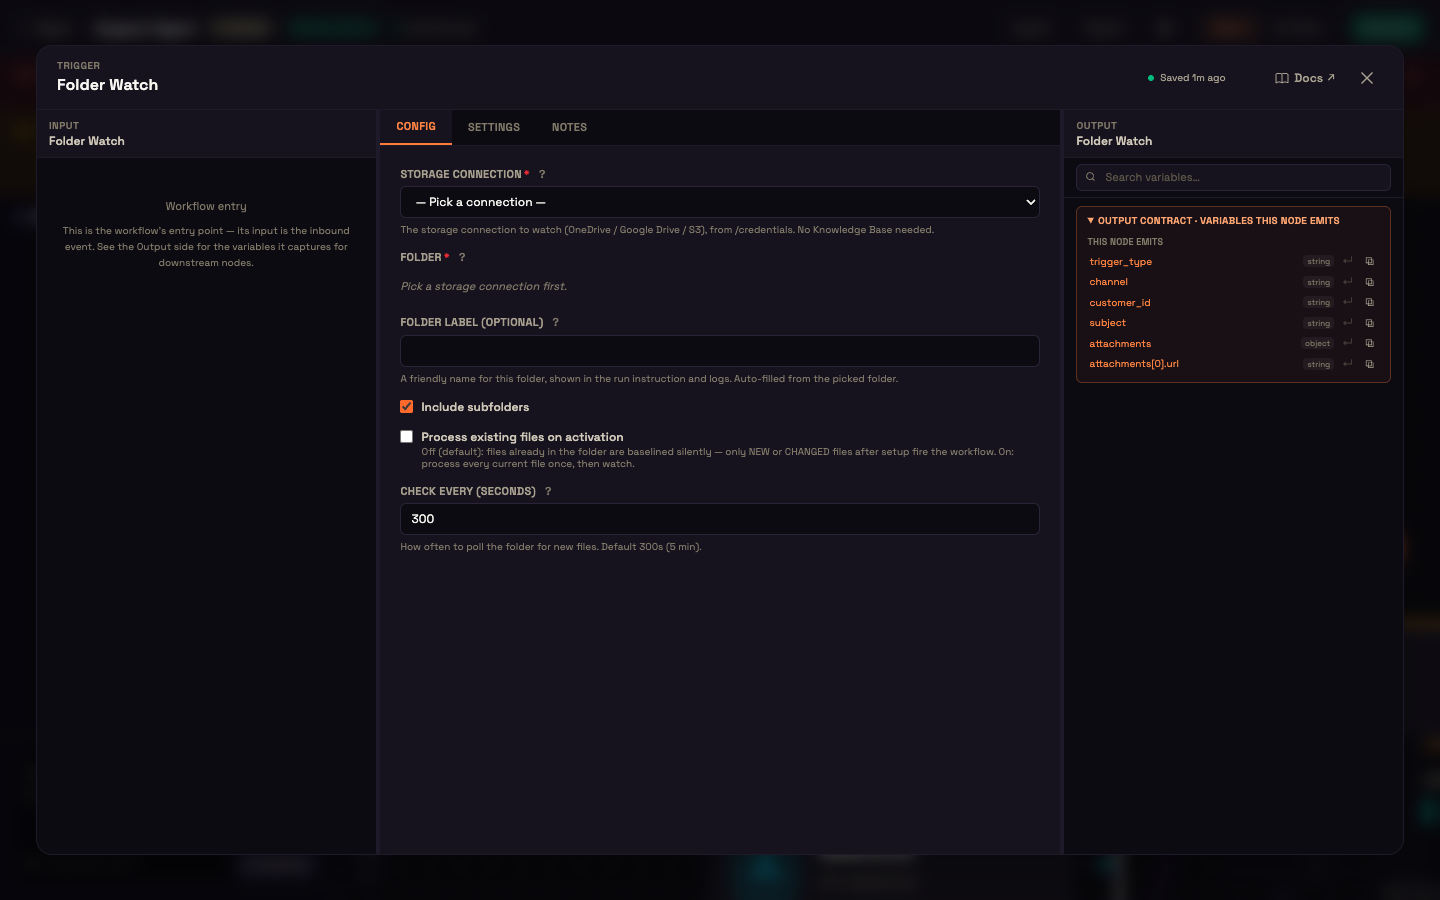
| Setting | Default | Effect |
|---|---|---|
| Storage connection (required) | — | A OneDrive / SharePoint, Google Drive or S3 connection from Connections. |
| Folder (required) | — | Browse to the folder to watch inside that connection. |
| Folder label | the folder's name | A friendly name used in the run's instructions and logs. |
| Include subfolders | On | Also watch folders inside it. |
| Process existing files on activation | Off | Off: files already in the folder are ignored, and only new or changed files start a run. On: every current file is processed once, then the folder is watched. |
| Check every (seconds) | 300 | How often the folder is checked for new files (30 seconds to 24 hours). |
Each new file is passed to the run in trigger.attachments. If the AI Agent after this trigger has no document tool, the builder warns you, since it may not be able to do much with the file.
Sub-Workflow trigger
The Sub-Workflow trigger makes this agent callable as a tool from another agent, through that agent's Action part.
| Setting | Effect |
|---|---|
| Input Contract | Click + Add Input for each value this agent expects: a name, a type (string, number, boolean, object, array or date), a description, and whether it's required. The calling agent fills these in, and later nodes here read each as {{ trigger.<name> }}. |
Manual Test trigger
The Manual Test trigger is for trying the agent while you build.
| Setting | Effect |
|---|---|
| Sample Test Payload (optional) | JSON that's handed to the run as its variables. |
Click Execute at the top of the panel to run the agent once; the result appears in the Output pane. No customer traffic is involved.
Common tasks
Route inbound WhatsApp to an agent
- Add the WhatsApp trigger and pick your number under Business Contact.
- Connect it to the AI Agent, and add a WhatsApp Sender on the AI Agent's Action port so it can reply.
- Click Activate.
Put the chat widget on your website
- Add the Web Chat trigger. In Configure, choose the capabilities and try them in Live preview.
- Open Install, enter your site under Allowed origins, turn on Require HMAC identity verification if the agent sees customer data, and click Generate Credentials.
- Save the secret, paste the snippet into your site, and Activate the agent.
Start an agent from another system
- Add the Webhook trigger, set a Webhook Path, and copy the Full URL.
- Set Auth Mode to Shared Secret or HMAC SHA-256 and click Generate.
- For a strict contract, set Payload Mode to Fixed and declare the fields.
- Activate, then call the URL — a valid call returns
200 { execution_id }.
Run on a schedule
- Add the Schedule trigger. Type a cron expression (or use ✨ Ask AI), pick the timezone, and check Next 3 Runs.
- Write the Instructions, try it with Run now, then Activate.
Process files dropped into a shared drive
- Add Folder Watch, pick the storage connection and folder.
- Connect a Document Processing node (or an AI Agent with a document tool) and Activate.
Feature reference
| Trigger | Settings |
|---|---|
| Phone Call / SMS / WhatsApp | Business Contact · Include / Exclude callers or senders |
| Business Contact · Include / Exclude senders · Where my inbox appears · From date | |
| Web Chat | Configure: Capabilities (+ voice mode) · Location Collection · Response Delivery · Conversation Starters · Pre-chat Form · Follow-up Suggestions · Live preview. Install: Allowed origins · HMAC verification · credentials and snippets · Appearance · UI commands · Danger zone |
| Webhook | Webhook Path · Full URL · Auth Mode · Auth Secret · Allowed Methods · Payload Mode · Expected Payload Fields · End-user identity fields · Attachment URL · Report as channel |
| Schedule | Run now · Cron Expression · Timezone · Next 3 Runs · Instructions |
| Internal Event | Event Type · Event Filter |
| Knowledge Base | KB Folders · Fire When |
| Folder Watch | Storage connection · Folder · Folder label · Include subfolders · Process existing files on activation · Check every |
| Sub-Workflow | Input Contract |
| Manual Test | Execute · Sample Test Payload |
What's next
- Canvas Basics — build the rest of the agent after the trigger.
- AI Agent Node — configure the node most triggers feed.
- Sender Nodes — let the agent reply on SMS, email and WhatsApp.
- Web Chat (Widget) — more on the widget.
- Embed Script Reference and Identity Verification (HMAC) — for your developers.