Outbound Notifications
Priya ordered a pair of shoes from Acme Store this morning. This afternoon the order ships, and before she thinks to check, her phone buzzes: "Hi Priya, your order is on its way. Track it here." Nobody at Acme lifted a finger. That's an outbound notification: a message your agent sends proactively, without waiting for the customer to write first.
By the end of this page you'll have built a flow that fires on its own, on a schedule or when your own system sends an event, and delivers an order update, a reminder or a "your report is ready" message over SMS, WhatsApp or email. This page is for an admin like Asha who builds on the canvas.
What you'll build
A flow that starts without a customer message. A Schedule or Webhook trigger starts it, an AI Agent writes the message if you want one, and a sender node delivers it.
Before you start
- For SMS or WhatsApp: a Plivo connection on Admin → Connections. WhatsApp messages that you start (rather than replies) must use a WhatsApp-approved template. See WhatsApp.
- For email: an email provider connection on Admin → Connections.
Every sender uses your own provider account. If a connection is missing when a message tries to send, Perfox tells you which connection to add rather than failing silently.
Steps
1. Choose the trigger
Two triggers fire with no customer message (click + → Triggers):
- Schedule: runs on a timetable you set with a cron expression and a timezone, for example a daily reminder run. See Automations.
- Webhook: runs whenever your own system calls the trigger's Full URL, for example when an order ships.
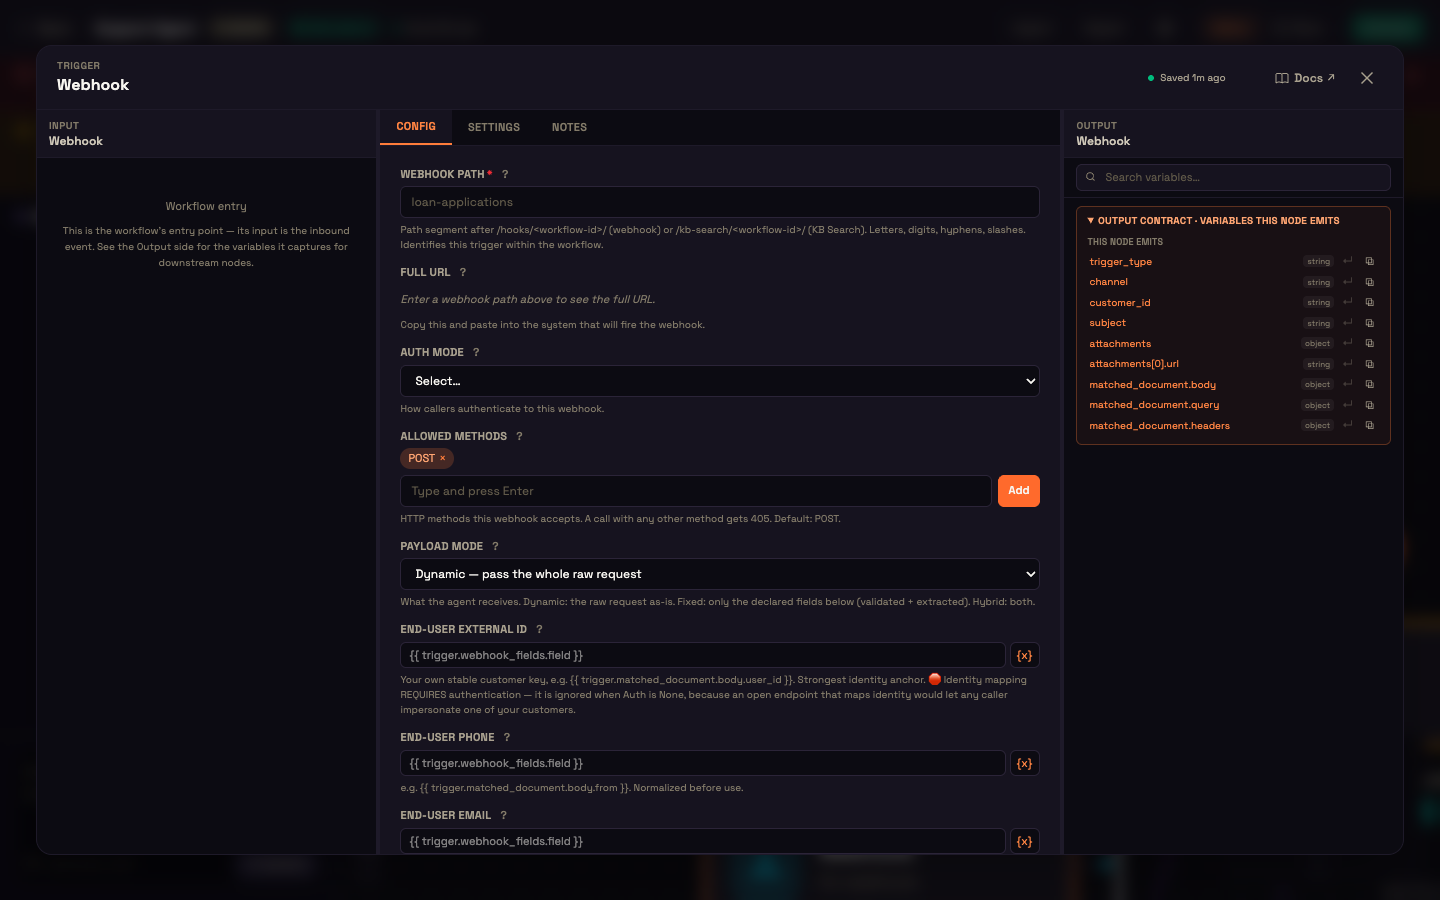
For a Webhook trigger, set:
- Webhook path: the last part of the URL, such as
order-shipped. The Full URL to give your system appears below it. - Auth mode: Shared Secret or HMAC SHA-256, so only your system can fire it. (None lets anyone with the URL fire it.)
- Payload mode: Dynamic passes the whole request through. Fixed accepts only the fields you declare under Expected Payload Fields, and rejects requests missing a required one.
- End-user Phone / End-user Email / End-user External ID: who the message is for, taken from the request, for example
{{ trigger.matched_document.body.phone }}. These only work when Auth mode isn't None, so an open URL can't be used to message your customers.
The request body's fields are also available to later steps as {{trigger.<field>}}, for example {{trigger.order_id}}. Fields from the request can never overwrite the customer identity Perfox resolved.
2. Build the flow
Put an AI Agent after the trigger to compose the message, with the sender on its Action port. For a message that is the same for everyone (a fixed text), you can also connect the trigger straight to a sender: click the + on the trigger and choose SMS Sender, WhatsApp Sender or Email Sender under What happens next?.
On the sender, set:
- Send from: your business number or address.
- Send to: The person in this conversation (the customer identified by the trigger), A fixed number / A fixed address (the AI can never change it), or Let the AI decide.
- What to send: Let the AI write it, or Use a template or fixed text. A fixed body with no
{{placeholders}}is sent exactly as written, which is ideal for compliance. A body with placeholders is a firm template the AI Agent fills in, for example from the trigger's data.
All {{ }} placeholders are filled by a safe expression evaluator. It never runs code and only reads known variables.
3. SMS rules in India (DLT)
Indian SMS needs DLT registration. The DLT entity ID, template ID and template category saved on your Plivo connection are attached to every SMS Perfox sends for you. Use a fixed body that matches your registered template word for word. Registering templates with the DLT platform is a regulatory step outside Perfox.
4. Activate
Click Activate. A Schedule then fires on its timetable, and a Webhook fires whenever your system calls its URL.
A full run, end to end
Setup. Asha, an admin at Acme Store, builds a flow: a Webhook trigger with path order-shipped, Auth mode set to Shared Secret, and End-user Phone mapped to {{ trigger.matched_document.body.phone }}. It's wired to an AI Agent whose Action port holds a WhatsApp Sender, with Send to set to The person in this conversation and her approved template: Hi {{name}}, your order is on its way. Track it here: {{tracking_url}}. She clicks Activate.
Action. When Priya's order ships, Acme's own system calls the trigger's URL with the shared secret:
json
{
  "phone": "+91 98XXX XXXXX",
  "name": "Priya",
  "tracking_url": "https://shop.example.com/track/8842"
}
Result. The trigger identifies Priya by her phone number, the AI Agent fills the template from the request, and the WhatsApp Sender delivers it:
Acme Store · WhatsApp Hi Priya, your order is on its way. Track it here: https://shop.example.com/track/8842
What just happened. No customer had to write first; the event from Acme's system was the only spark. The phone number in the request identified the recipient, the agent filled the template from the same request, and the message went out through Acme's own Plivo WhatsApp number.
Test it
- Schedule: click Run now at the top of the Schedule node to fire one run immediately.
- Webhook: call the Full URL with a sample body and your secret, then check Runs on the canvas and the conversation in Engage → Conversations.
- Or add a Manual Test trigger to the same flow and run it from the canvas.
Variations
- Fetch data first. Add an HTTP Request step before the sender to pull live data, such as order status, into the message.
- Let the AI write it. Set the sender's Message content to Let the AI write it and give it Guidelines for the AI, so each message is personal.
- Email and SMS together. Put both an Email Sender and an SMS Sender on the agent's Action port and tell it in the instructions when to use each.
See also
- Trigger Nodes — the Schedule and Webhook triggers in full.
- Messaging actions — every option on the three senders.
- SMS · WhatsApp · Email — per-channel setup.