Web Chat (Widget)
At 11 pm a visitor lands on the Acme Diagnostics site, clicks the chat bubble and asks about a report. There's no phone call and no waiting until morning. This page shows how to put that chat widget on your own site, choose what it can do, and have it recognise a customer you already know.
Web is the one channel that needs no provider account. You set it up entirely in the Web Chat trigger.
Where web is configured
Add a Web Chat trigger to an agent and connect it to the AI Agent. Its panel has two tabs, Configure and Install, plus a Live preview button that opens the widget as your visitors will see it.
Web needs no Sender node. The agent's reply goes straight back through the widget. (Senders are only for email, SMS and WhatsApp; see Channel Overview.)
Configure
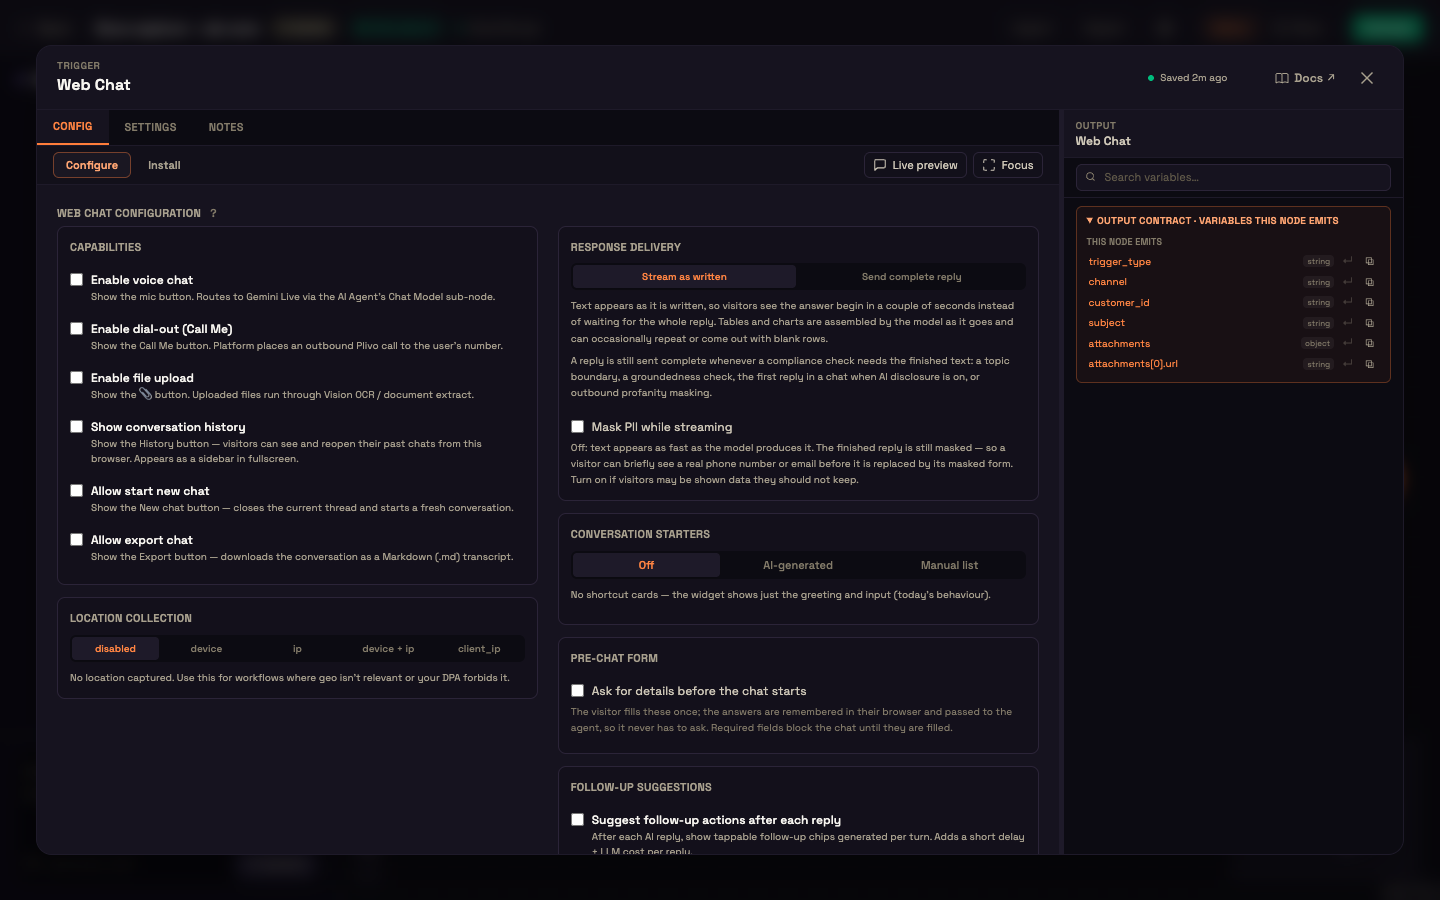
| Section | Options |
|---|---|
| Capabilities | Enable voice chat (mic button, which uses the voice model on the agent's AI Model sub-node) · Enable dial-out (Call Me) (Perfox calls the visitor's phone from your Plivo number) · Enable file upload (Perfox reads uploaded files) · Show conversation history · Allow start new chat · Allow export chat (a Markdown transcript) |
| Location collection | disabled · device · ip · device + ip · client_ip |
| Response delivery | Stream as written (text appears as it's written) or Send complete reply, plus Mask PII while streaming |
| Conversation starters | Off · AI-generated · Manual list of shortcut cards |
| Pre-chat form | Ask the visitor for details before the chat starts. Answers go to the agent so it doesn't have to ask |
| Follow-up suggestions | Tappable follow-up chips after each reply |
Install
Before the widget can go on a site, generate its credentials. On the Install tab, list your Allowed origins (scheme + host + optional port, one per line; the widget refuses requests from any other site), choose whether to Require HMAC identity verification, then click Generate Credentials. Test on external site opens a test page connected to this agent.
After that, the Install tab shows:
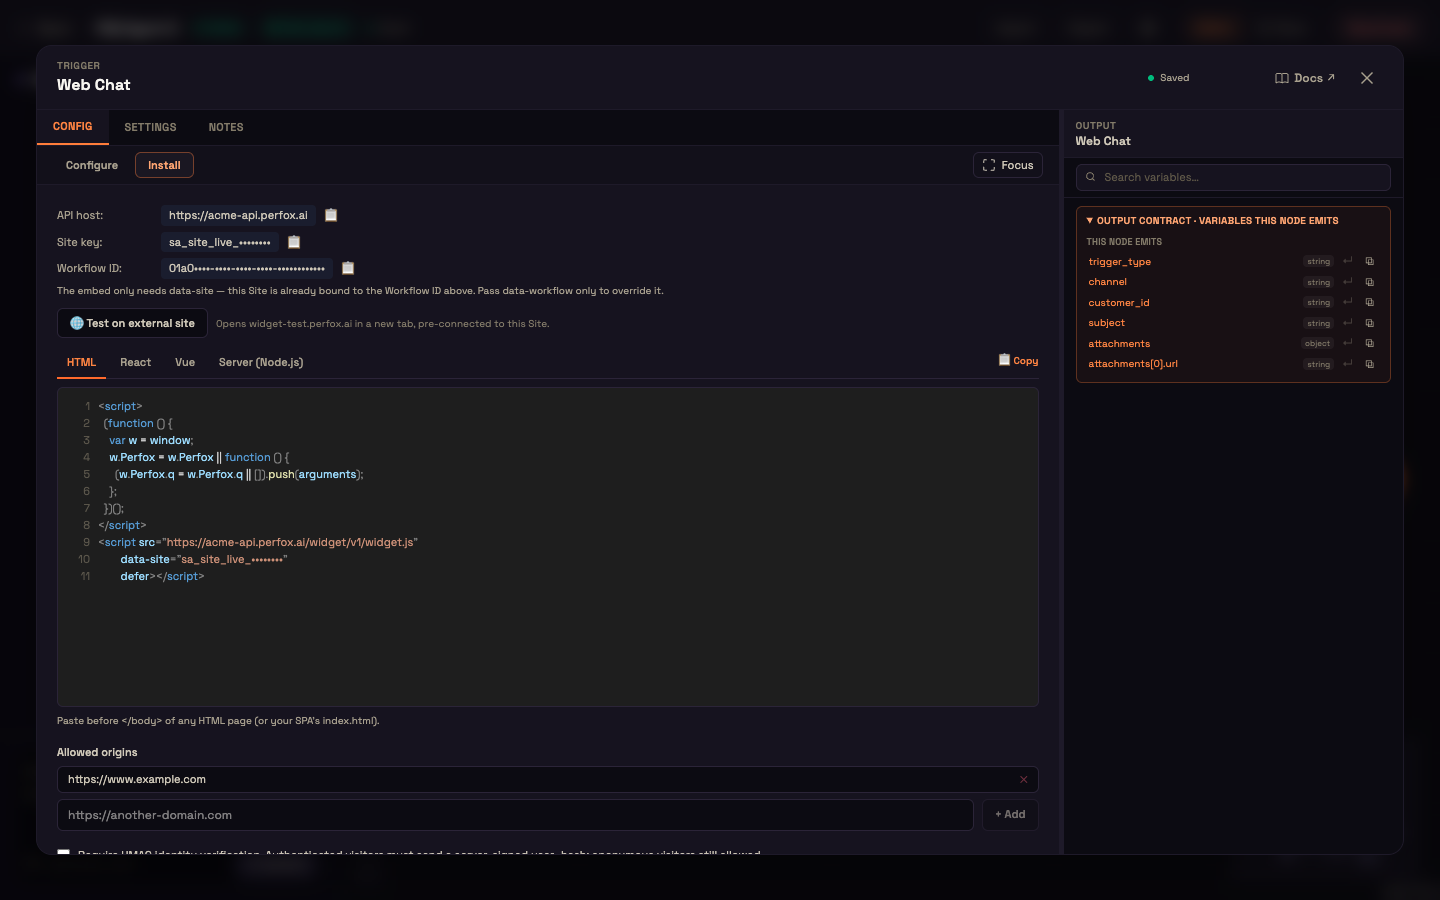
- The API host and the public Site key (
sa_site_live_…), with ready-to-paste HTML, React, Vue and Server (Node.js) snippets. - Allowed origins and the HMAC identity verification toggle.
- Secrets: Rotate the server-side secret (the old one keeps working for a grace window) or Revoke now.
- Appearance: display name, avatar URL, primary colour, bubble position, open the chat automatically on page load, open fullscreen.
- Client-side UI commands: let the agent drive your page (navigate, highlight, prefill…).
- A danger zone with Suspend embedding and Delete credentials.
Setup
- Create an agent with a Web Chat trigger and connect it to the AI Agent.
- On Configure, turn on the capabilities you want.
- On Install, add your site to Allowed origins and click Generate Credentials.
- Copy the snippet for your framework and paste it into your site.
The full embed walkthrough is in the Embedding Quickstart.
Voice, Call Me and file upload
When a capability is on but its prerequisite is missing (for example Call Me with no Plivo call number), the widget hides that button, so a visitor never sees a button that would fail. Browser voice needs nothing beyond the toggle. To start voice or Call Me from your own page, see Voice & Dial-Out.
Identity and trust
Web visitors start out anonymous. To link a visit to a real customer, your page calls window.Perfox('identify', {...}) with what it knows: name, phone, email, external_id (your stable customer ID), attributes, and user_hash (a signature your server computes). The full field list is in User Context & Identity.
Each conversation gets a trust level:
| Trust level | When |
|---|---|
| Anonymous | no external_id |
| Self-asserted | an external_id without a valid signature |
| Verified | an external_id with a valid user_hash |
Your Site key is public, so for any agent that handles customer data, turn on Require HMAC identity verification. Your server signs <site_id>.<external_id> with the site secret (HMAC-SHA256), and Perfox then trusts an identity only when the signature matches. Anonymous visitors are still allowed. See Identity Verification.
The identity is passed to your own tools with each call, so a signed-in visitor doesn't have to log in again inside the chat.
Recognising returning customers
An external_id is the strongest link. The same ID always means the same customer, whichever channel they use. Without one, Perfox falls back to your choice under Settings → Cross-Channel Customer Identity: either Business external ID only (the default) or Let Perfox unify by these fields, where every field you select (for example mobile + name) must match. A visitor who gives no identifier at all stays anonymous. See Customer Identity.
Worked example: Priya's report follow-up
Setup. Asha adds a Web Chat trigger, turns on Enable voice chat and Enable file upload, adds https://acme-diagnostics.example to Allowed origins, turns on HMAC verification and pastes the HTML snippet into the Acme site. Priya is signed in to her Acme account, so the site signs her identity on the server and calls identify:
js
window.Perfox('identify', {
  name: 'Priya',
  email: 'priya@example.com',
  external_id: 'acme-cust-4821',
  user_hash: '<server-computed HMAC-SHA256 of sa_site_live_….acme-cust-4821>',
});
Action. Priya opens the chat and types: "My blood test from last week — is the haemoglobin in range?"
Result. The conversation is verified. Acme's own tools receive Priya's identity with the request and look up her record without asking her to log in. She sees:
Agent: Hi Priya. Your haemoglobin from 21 July is 13.2 g/dL, which is within the normal range. Want me to email you the full report?
What just happened. The signed user_hash turned Priya's anonymous visit into a verified one, and the Allowed origins check confirmed the request came from Acme's real site. Because her external_id matched an existing customer, her earlier conversations are under the same customer record.
Where to go next
- Embedding Quickstart: the copy-paste embed walkthrough.
- Identity Verification (HMAC): signing
external_idon your server. - User Context & Identity: every field
identifyaccepts. - Voice & Dial-Out: browser voice and Call Me from your page.
- Voice Providers: the voice the mic button uses.