Plivo (SMS / WhatsApp / Voice)
Priya texts Acme Support, calls their hotline, and sends a WhatsApp message, all on the same day. With one Plivo connection in your workspace, each of those reaches the right agent.
This page is for workspace admins who already have a Plivo account. By the end you'll have your keys saved, your numbers tagged by channel, and Plivo pointed at Perfox so messages and calls come in.
What Plivo powers
One Plivo connection covers three channels: SMS, WhatsApp (Plivo as your WhatsApp provider) and phone voice. You bring your own Plivo account and Perfox uses your keys when it sends or receives. Your keys are encrypted and stay in your workspace. If the connection is missing or its keys are blank, a send stops with a message that points you back to Credentials. It never fails silently. (See Bring Your Own Provider.)
Plivo works in both directions on all three channels. Perfox sends SMS and WhatsApp messages and places calls from your numbers. It also receives inbound SMS, WhatsApp messages and calls once Plivo is pointed at your workspace (see Point Plivo at Perfox).
Connect Plivo
- Open Admin → Credentials. Plivo is under Telephony & Messaging.
- Click Connect. The Connect Plivo window asks for:
- Name and an optional Description.
- Auth ID and Auth Token from your Plivo console. These are the only required fields.
- Optional fields, grouped by channel: SIP Domain / SIP Username / SIP Password under Phone, the three DLT fields under SMS (India only), and WABA ID — for template sync under WhatsApp.
- Click Create.
You don't type phone numbers here. As the window says, once the connection is saved you open it to find your Plivo numbers and assign each one to Voice, SMS or WhatsApp.
The Plivo editor
Plivo is edited on the Credentials page itself, not in a pop-up. Click Edit on your Plivo card (or click the card) and it expands:
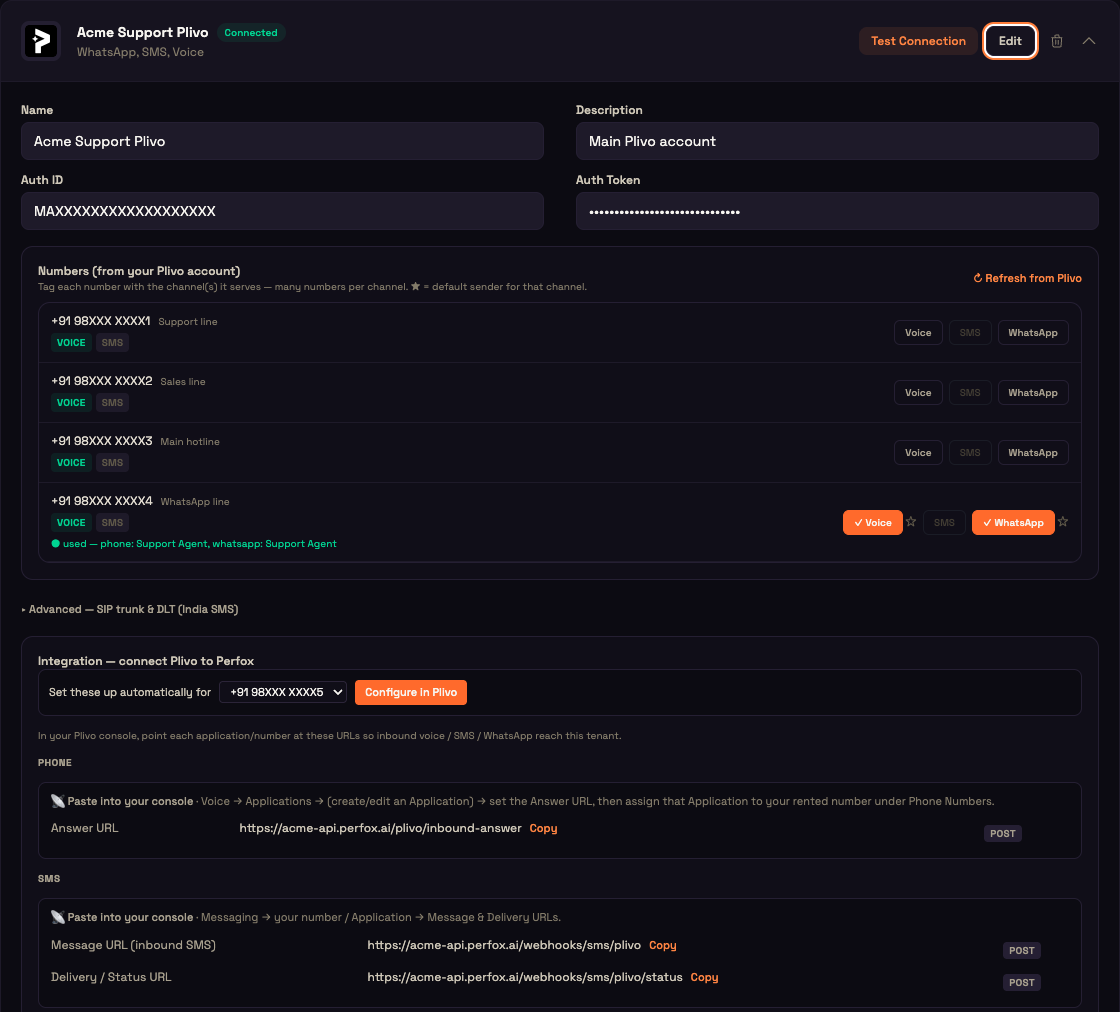
From top to bottom:
- Name, Description, Auth ID and Auth Token. The token is hidden until you click Reveal.
- Numbers (from your Plivo account): the numbers on your account, where you tag each one with its channels.
- Advanced — SIP trunk & DLT (India SMS): a collapsed section with the optional SIP and DLT fields.
- Integration — connect Plivo to Perfox: a one-click setup button and the webhook URLs to paste into Plivo.
- A Save changes button at the bottom. It reads Saved when nothing has changed.
Text fields (name, keys, advanced fields) only save when you click Save changes. The page warns you if you try to leave with unsaved edits. Number tags are the exception: they save on their own (see below).
Your numbers
Plivo keeps the list of your numbers, so you never type them in. When you open the editor, Perfox reads the numbers on your saved Plivo account. For each one it shows:
- The number in full international format (
+91…) and the label you gave it in Plivo. - VOICE and SMS badges. A green badge means that capability is switched on for the number in Plivo.
Click ↻ Refresh from Plivo to read the list again, for example after buying a number.
Perfox can only read your numbers after the Auth ID and Auth Token are saved. If it can't list them, it tells you why:
| Message | What to do |
|---|---|
| Add your Plivo Auth ID and Auth Token and save first, then discover numbers. | Save the keys, then refresh. |
| Plivo rejected the Auth ID / Auth Token — double-check them. | Re-copy both values from your Plivo console. |
| Could not reach Plivo to list numbers. Try again in a moment. | A temporary problem reaching Plivo. Try again. |
| No numbers found on this Plivo account. | Buy or port a number in Plivo first. |
Tag each number with its channels
Each row has three chips: Voice, SMS and WhatsApp.
- Tag. Click a chip to use that number for that channel. It turns orange and shows a tick (for example ✓ Voice). One number can serve several channels, and several numbers can serve one channel. Untagging a number's last channel removes it from your list.
- Default sender (★). Once a number is tagged, a star appears next to the chip. Click it to make that number the default sender for the channel, and click the filled ★ again to clear it. Each channel has at most one default.
- What Plivo allows. The Voice chip only works if the number is voice-enabled in Plivo, and the SMS chip only if it is SMS-enabled. Plivo doesn't report WhatsApp, so the WhatsApp chip is always available and you decide which number is your WhatsApp sender.
- In use. A line such as ● used — phone: Support Agent shows which agents currently use the number.
- Numbers no longer in Plivo. A number you tagged earlier but has since been released in Plivo still shows, so you can untag it.
Tags and stars save automatically a moment after you click. You'll see Saving number tags… and then ✓ Number tags saved. If saving fails, the message asks you to change the tag again or click Save changes.
Only numbers tagged for a channel appear as options for that channel when you build an agent.
Which number sends
For each channel, Perfox sends from the default (★) number. If there isn't one, it uses the first number tagged for that channel. For voice, the same number is used as the caller ID for outgoing calls. A channel with no tagged number can't send, so tag at least one number for every channel you want to use.
If you open a Plivo connection that was set up before number tagging existed, Perfox builds the tags from the numbers that connection already had, so nothing is lost.
Advanced — SIP trunk and DLT (India SMS)
Click ▸ Advanced — SIP trunk & DLT (India SMS) to open six optional fields. The section opens by itself if any of them already has a value. They save with Save changes.
| Field | Use |
|---|---|
| SIP Domain, SIP Username, SIP Password | A Plivo SIP trunk. You don't need these for AI calls in either direction, because inbound and outbound calls both run on your tagged Voice numbers. Leave them blank unless Perfox support asks you to fill them in. |
| DLT Entity ID, DLT Template ID, DLT Template Category | India SMS rules (TRAI DLT). Paste these from your DLT portal. Perfox attaches them to every SMS it sends to an Indian number. |
Registering your SMS templates on the DLT platform (Jio, Airtel, Vodafone Idea) is a regulatory step you complete with the carriers. Perfox can't do it for you. Without valid DLT details, Indian carriers can drop the message.
Point Plivo at Perfox
To receive messages and calls, Plivo has to send them to your workspace. The Integration — connect Plivo to Perfox panel gives you two ways to set this up.
One click: Configure in Plivo
At the top of the panel, Set these up automatically for lists the numbers you've tagged for Voice. Pick one and click Configure in Plivo. Perfox then:
- creates or updates an Application in your Plivo account that holds your workspace's Answer URL (for calls) and Message URL (for SMS),
- attaches that Application to the number,
- checks the number again to confirm it's attached.
What you see next:
| Result | Meaning |
|---|---|
| Done — … is set up and … is pointed at it. | The number now rings your agents and sends its SMS to Perfox. |
| … was configured, but … is still bound to something else in Plivo | The Application was saved, but the number is still attached to something else, often a PHLO flow, which Perfox can't change. Open the number in your Plivo console and select the Application. |
| Plivo rejected the Auth ID / Auth Token — double-check them. | Fix the keys and save first. |
The one-click setup covers voice and inbound SMS. It doesn't set up WhatsApp webhooks or delivery-status URLs, so add those by hand as described below.
By hand: paste the URLs
Under the button, the panel shows a 📡 Paste into your console block for Phone, SMS and WhatsApp. Each block says where the setting lives in the Plivo console and lists the URLs already built for your workspace, each with a Copy button and its HTTP method.
Every URL uses your workspace's API address:
text
https://<your-workspace>-api.perfox.ai| Channel | URL to paste (method POST) | Where in the Plivo console |
|---|---|---|
| Voice: incoming calls | https://<your-workspace>-api.perfox.ai/plivo/inbound-answer | Voice → Applications → create or edit an Application → Answer URL, then assign the Application to your number under Phone Numbers |
| SMS: incoming messages | https://<your-workspace>-api.perfox.ai/webhooks/sms/plivo | Messaging → your number / Application → Message URL |
| SMS: delivery status | https://<your-workspace>-api.perfox.ai/webhooks/sms/plivo/status | Messaging → your number / Application → Delivery / Status URL |
| WhatsApp: incoming messages | https://<your-workspace>-api.perfox.ai/webhooks/whatsapp/plivo | Messaging → WhatsApp → your WhatsApp number webhooks → Inbound message URL |
| WhatsApp: delivery reports | https://<your-workspace>-api.perfox.ai/webhooks/whatsapp/plivo/status | Messaging → WhatsApp → your WhatsApp number webhooks → Delivery Reports URL |
Copy the URLs from the panel rather than typing them, because a URL on the wrong address never reaches your workspace. You only set up incoming calls in Plivo. For outgoing calls, Perfox supplies the answer URL itself.
How incoming messages and calls are routed
An incoming SMS or WhatsApp message is matched to a customer and then to the published agent whose trigger watches the number it was sent to. An incoming call reaches the agent whose Phone trigger watches the number that was called. If no published agent watches that number, nobody replies. Publish an agent with a trigger on the number to fix it (see Channels Overview).
Delivery reports: "sent" is not "delivered"
When Plivo accepts a message, it has only been queued. Plivo reports the real outcome later: queued → sent → delivered → read, or failed. Perfox attaches its own status address to every SMS and WhatsApp message it sends, so you get these reports without any extra setup.
The ticks appear on the message in Conversations. A failed send, for example Plivo error 900 (insufficient credits), shows as failed instead of looking like the customer never answered.
Worked example: connecting Plivo for the first time
Setup. Asha is the admin at Acme Support. Her Plivo account has two numbers: a support line (voice and SMS) and a WhatsApp line.
Action.
- In Admin → Credentials, she clicks Connect on Plivo, pastes her Auth ID and Auth Token, and clicks Create.
- She clicks Edit on the new Plivo card. Both numbers are listed with their VOICE and SMS badges.
- She tags the support line Voice and SMS and stars it for both, then tags the WhatsApp line WhatsApp. ✓ Number tags saved appears.
- Under Integration, she picks the support line and clicks Configure in Plivo. The panel reports that the number is pointed at the Application.
- She copies the two WhatsApp URLs into her WhatsApp number's webhook settings in the Plivo console.
Result. Priya texts the support line. Plivo passes the message to Acme Support's workspace, the agent with an SMS trigger on that number replies from the same number, and the reply's delivery status appears in Conversations.
What just happened. Saving the keys let Perfox read the numbers. Tagging told it which number to send from on each channel. The one-click setup and the pasted URLs told Plivo where to deliver incoming traffic.
Troubleshooting
| Symptom | Likely cause |
|---|---|
| A send stops with a "configure this provider" message | No Plivo connection, or the Auth ID or Auth Token is empty. |
| The number list says to save your keys first | The keys aren't saved yet. Save them, then click ↻ Refresh from Plivo. |
| The Voice or SMS chip is greyed out | That capability is switched off for the number in Plivo. |
| A channel can't send | No number is tagged for that channel. |
| SMS goes out but replies never arrive | The Message URL isn't set in Plivo, or points to the wrong address. |
| Calls don't reach the agent | The number isn't attached to the Application (try Configure in Plivo, and check for a PHLO flow on the number), or no published agent has a Phone trigger on it. |
| India SMS shows failed or never arrives | DLT fields are missing, or the template isn't registered with the carriers. |
What's next
- SMS Channel: build agents that send and receive SMS.
- WhatsApp Channel: WhatsApp conversations through Plivo.
- Voice Channel: incoming and outgoing phone calls.
- Connections: manage all your provider connections.
- Provider Matrix: every provider and its webhook addresses.