Users
When a new colleague joins the Acme Support team, all you need is their name, their email and a role — they'll be signed in to the Studio within minutes.
The Users page (/users) is your team roster — the people who sign in to the Studio to build agents and handle conversations. From here you invite someone, change their roles, resend an invite, deactivate or reactivate access, or remove a member, with guards that stop you from ever locking yourself (or the whole team) out.
Before you start
This page is about your team members. The people who chat with your agents are customers and appear under Engage → Customers. Roles are defined on the Roles page; this page assigns them to people.
You need admin access to see or manage Users. Without it you see an "insufficient permissions" message instead of the roster.
| Page | Route | What you do there |
|---|---|---|
| Users (this page) | /users | Invite, re-role, resend invites, deactivate, reactivate and delete team members |
| Roles | /roles | Define the permission sets you assign here |
The roster
Go to Admin → Users. The header shows how many team members you have, a Search users... box and an Invite User button. Each member appears as a card.
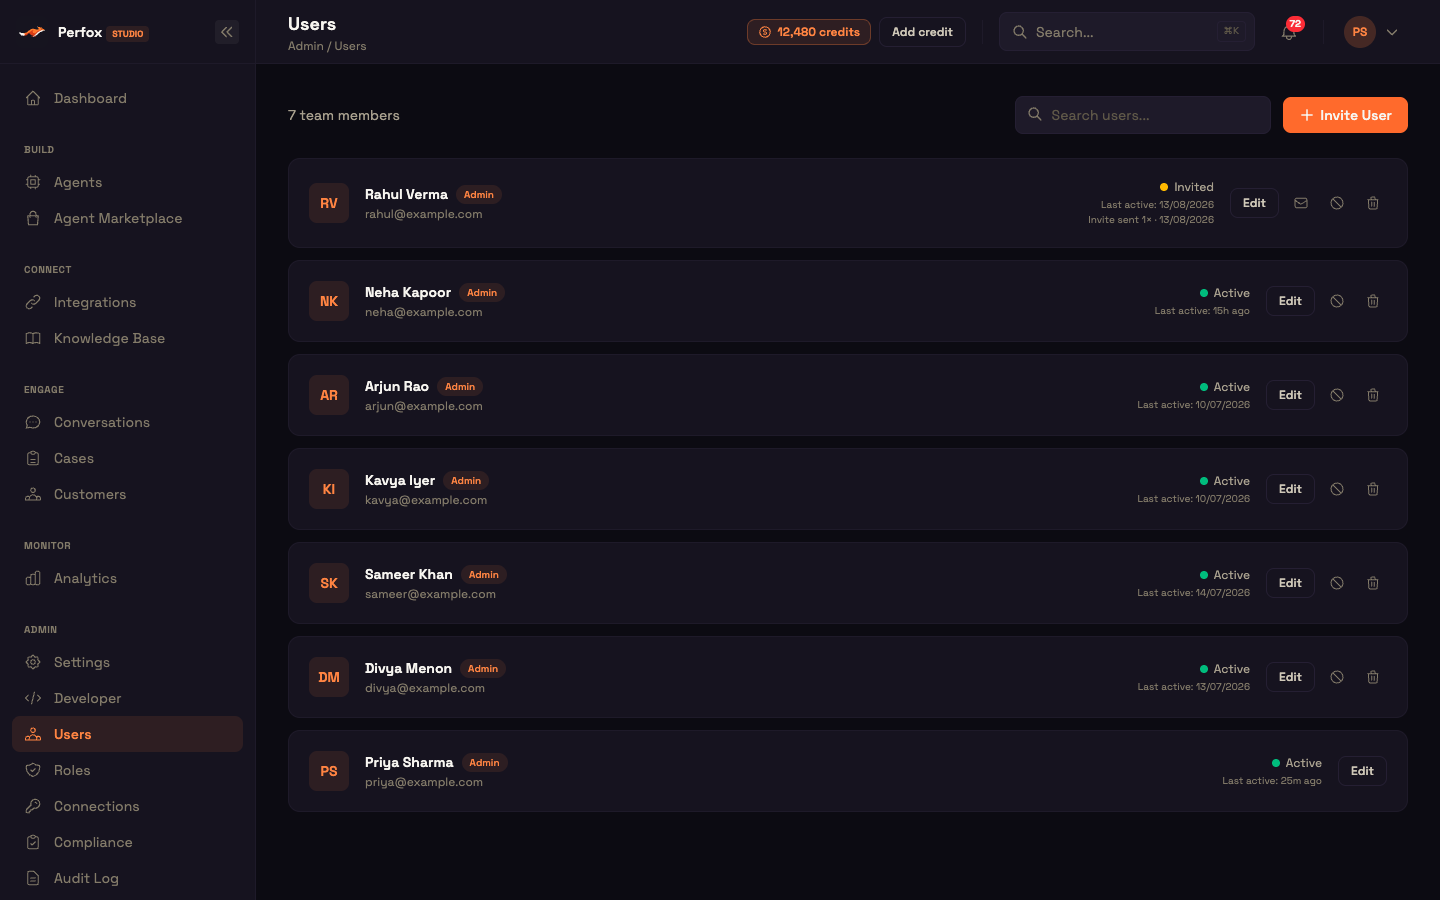
Each card shows:
- Initials avatar, tinted by the member's main role.
- Name and one badge per role (a member with no role shows a grey No role badge).
- Email.
- Status — a coloured dot and label (see below).
- Last active — a relative time such as "25m ago" or "15h ago", or a date. For someone who has never signed in, it shows when the account was created.
- For invited members, Invite sent N× · date — how many invites you've sent and when the last one went out.
- Actions on the right: Edit, and — depending on the member's status — resend invite, deactivate / reactivate, and delete icons.
Status
| Status | Dot | Meaning |
|---|---|---|
| Active | green | Signed in and holding roles |
| Invited | amber | Invite sent; not signed in yet |
| Inactive | grey | Deactivated — no access |
Search
The search box filters the roster as you type, matching any part of a member's name or email (case-insensitive) — "asha" or "@acme" both work.
| Situation | What you see |
|---|---|
| No team members yet | No team members yet, with an Invite User button |
| Nothing matches | No users match your search — No results for "…" |
Inviting a user
Click Invite User and fill in Full Name, Email and at least one role. Send Invite stays disabled until all three are set.
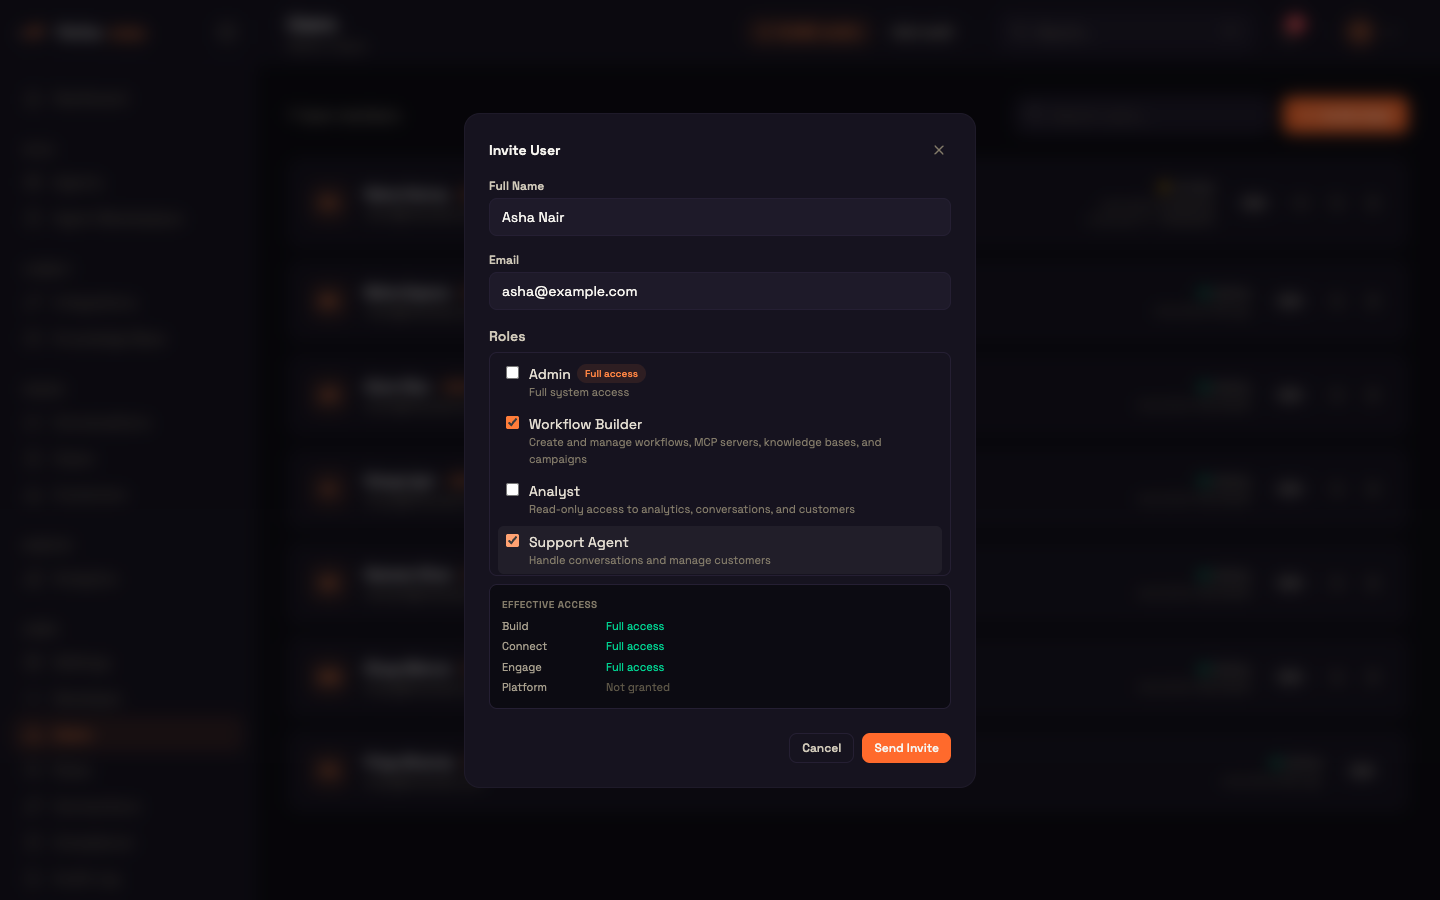
When you send the invite, Perfox creates the account (with no password for the invitee to set), assigns the roles, marks the member Invited, and emails them a sign-in link — clicking it signs them straight in. They land on a welcome page with your workspace name. If the link expires first, they can request a new one, or you can resend it.
A confirmation appears — "Invite sent to … They'll receive an email with a link to join." — and the new member shows up in the roster with an amber Invited status, which flips to Active on their first sign-in. If something goes wrong, the error appears inside the dialog so you don't lose what you typed.
Credits required
Adding a teammate uses credits. If your balance is zero, the invite is refused and the Add credits pop-up opens. Every new workspace starts with 5,000 free credits — see Accounts & Billing.
Resending an invite
Invited members have a resend invite (envelope) icon that emails a fresh sign-in link ("New invite link sent to …"). On an Inactive member, the same icon reactivates them — restoring their previous roles — and emails a fresh sign-in link.
Worked example — inviting Asha
Setup: Asha is joining Acme Support as a team lead. She needs to build and publish agents and handle conversations.
Action: Click Invite User, enter her name and work email, and tick Workflow Builder and Support Agent. The Effective access panel shows Build, Connect and Engage as Full access. Click Send Invite.
Result: Asha receives an email with a sign-in link, clicks it, and lands in the Studio. Her card shows an Active status with Workflow Builder and Support Agent badges.
Editing a user's roles
Click Edit on a card to open Edit User with the member's current roles ticked. Change the selection and save.
Saving replaces the member's whole role set at once, and the change applies on their next request — no sign-out needed. Clearing every role removes all their permissions.
Your own card
You can edit your own roles, but the deactivate and delete icons are hidden on your own card so you can't lock yourself out by accident.
The role picker
The Invite and Edit dialogs share the same role list — each role's name and description, with a checkbox.
- A member can hold several roles; their permissions are everything those roles grant combined.
- A role with full access (such as Admin) carries a Full access badge. Ticking it marks the other roles Included — they're covered already, so they're shown ticked and greyed out. Unticking the full-access role restores your earlier picks.
- The Effective access panel underneath summarises what the selection actually grants, section by section (Full access, the specific permissions, or Not granted). With nothing selected it reads "No access — select at least one role."
Deactivate, reactivate, delete
| Action | Shown for | Reversible? | What happens |
|---|---|---|---|
| Deactivate | Active and invited members | Yes | They lose all access immediately and are signed out everywhere. Their roles are set aside and restored if you reactivate. |
| Reactivate | Inactive members | — | Restores their previous roles and sets them Active. |
| Delete | Any member except yourself | No | Permanently removes the account and signs them out. The same email can be invited again later. |
Each action asks for confirmation first; Delete uses a red confirmation button.
Safety guards
Two guards stop your workspace from locking itself out. They are enforced on the server, whichever way the request arrives.
- Not yourself — you can't deactivate or delete your own account.
- Not the last admin — you can't deactivate or delete the last active member with admin access. You'll see: "Cannot remove the last administrator — assign the Admin role to another user first."
Built-in roles
Four built-in roles are always available:
| Role | Access |
|---|---|
| Admin | Full access to everything |
| Workflow Builder | Build and publish agents, manage MCP servers and the knowledge base, read conversations |
| Analyst | Read-only access to analytics, conversations and customers |
| Support Agent | Handle conversations and manage customers |
You can also create your own roles on the Roles page.
Sign-in and sessions
Team members sign in with a magic link (the same mechanism as the invite), with email and password if it's enabled, or with your company's Single Sign-On if you've set it up in Settings → Authentication. Sessions last 30 days. Permissions are checked on every request, so role changes take effect straight away.
See Authentication for the full sign-in model.
Where to go next
- Roles — define the permission sets you assign here
- Accounts & Billing — your credit balance (inviting a teammate uses credits)
- Settings — sign-in methods, including Single Sign-On
- Customers — the people who chat with your agents