Canvas Basics
Asha needs an agent that answers WhatsApp messages from Acme Support's help docs — and she wants to try it before a single real customer sees it. The Agent Builder canvas is where all of that happens: you describe or draw the agent, wire nodes together, and test it on the same screen.
This page is for anyone building or editing agents for the first time. You'll learn how the builder is laid out, the three ways to add nodes (including letting Build with AI draft the whole agent), how nodes connect, how activation works, and how to test before you go live.
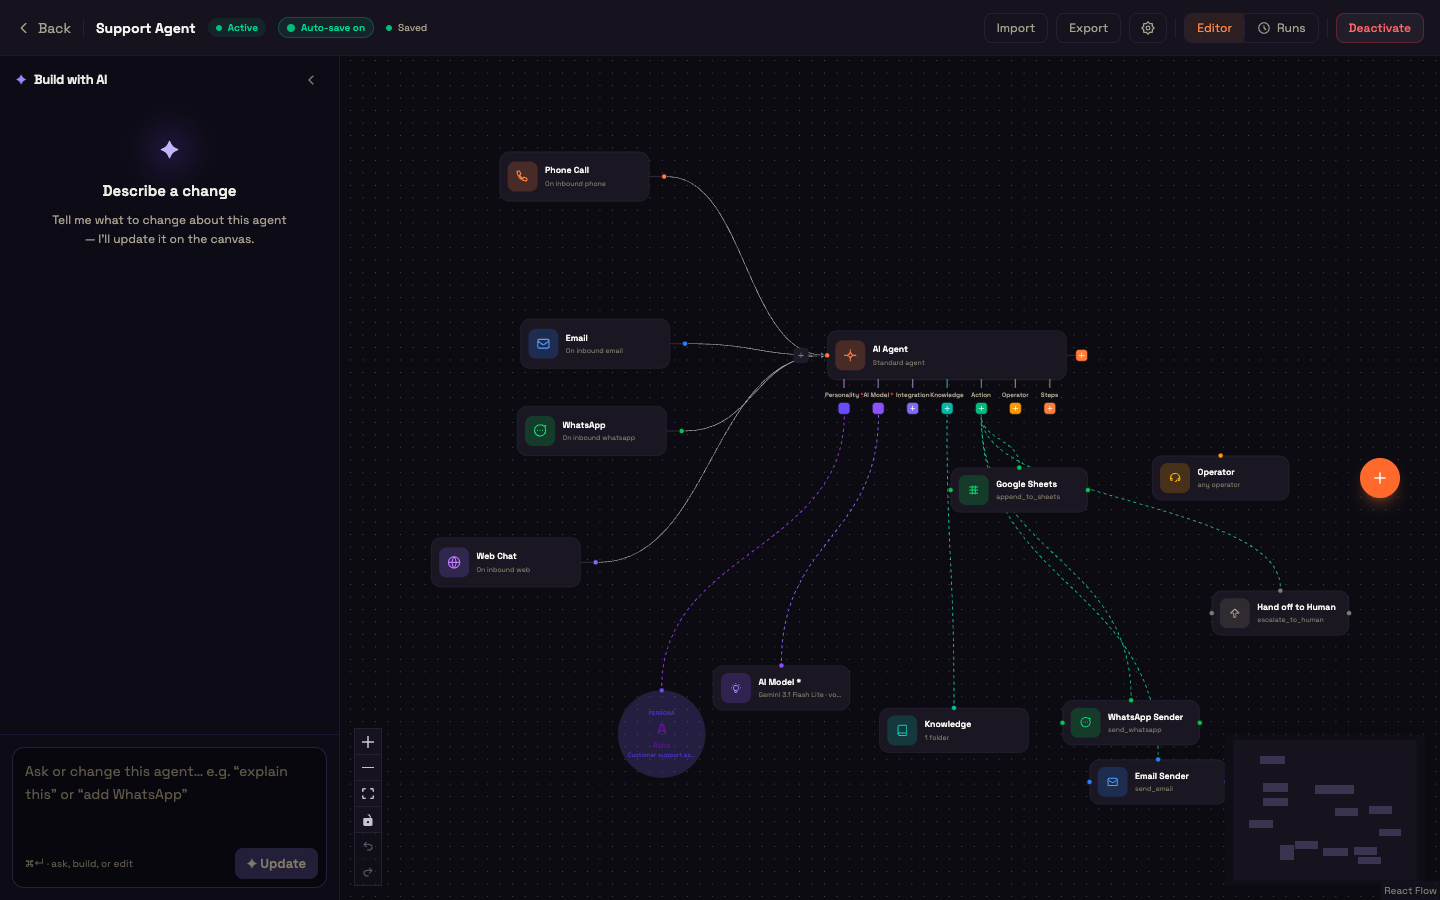
Creating an agent
Go to Build → Agents and click New Agent. The Create New Agent dialog asks for:
| Field | What it's for |
|---|---|
| Name | The agent's name in the list and toolbar. |
| Description (optional) | A one-line summary. |
| Tags (optional, comma-separated) | Labels for finding the agent later. |
| Compute | Where the agent runs: Standard (shared, runs instantly — right for most agents), Premium, or Dedicated (a machine reserved for this agent). You can change this later in the agent's settings. |
Click Create Agent and the builder opens on an empty canvas.
What you're looking at
The builder fills the screen and has five regions:
- a toolbar across the top — the agent name, its status, save state, and every top-level action;
- the Build with AI panel on the left — a co-pilot you can describe the agent to (collapse it with the
‹button); - the canvas — a dotted surface with zoom, fit-to-view and undo/redo controls in the bottom-left and a mini-map in the bottom-right;
- a node picker drawer that slides in from the right when you add a node;
- a properties modal that opens when you configure any node.
An agent is a graph of nodes. Flow nodes (a trigger, the AI Agent, a Condition, a Collect Info step…) run as steps, one after another. Agent parts (Personality, AI Model, Knowledge, Integration, Operator) hang off an AI Agent and describe it — they never run as steps of their own.
Build with AI
The fastest way to start is to describe the agent in plain language. On an empty canvas the Build with AI panel shows Describe your agent, a text box, and six starter recipes — Website support, Email support & triage, Order status assistant, Appointment booking, Lead capture, and FAQ bot. Clicking a recipe fills in the description for you.
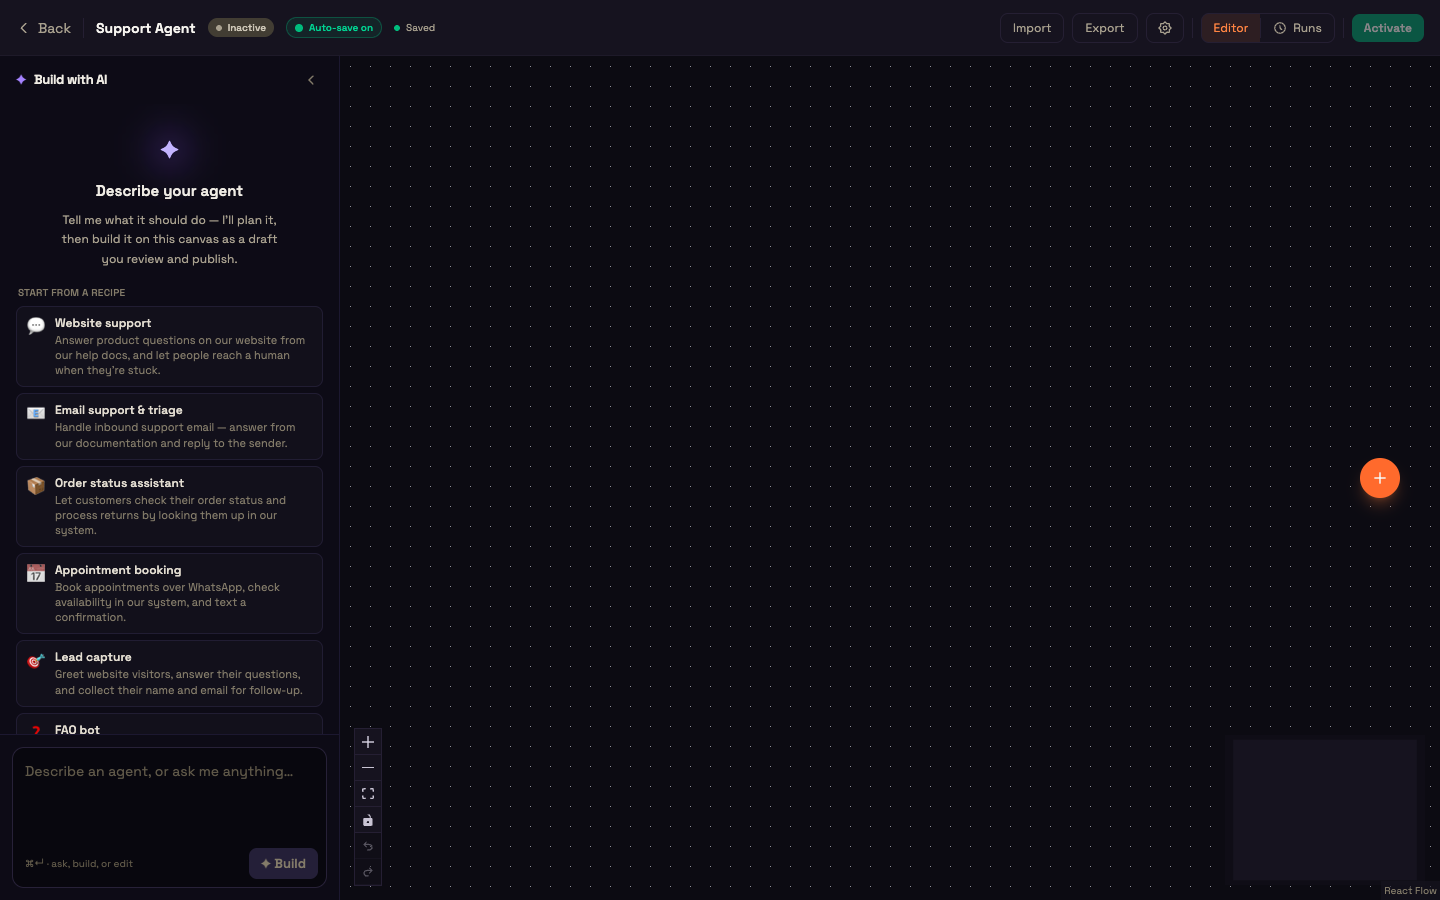
Press Build (or ⌘/Ctrl + Enter) and the co-pilot answers with a plan before it touches the canvas:
- a short numbered plan of what the agent will do;
- Which channels? — pick one or more of web, SMS, email, WhatsApp, and phone;
- Capabilities — chips the co-pilot suggests and you decide on: Knowledge Base, Integration, Call an HTTP endpoint, Query a database, Read a file, Google Sheets, Generate a report, Send email, Send SMS, Send WhatsApp, Make a phone call, Call another agent, Show cards / choices, and Human hand-off.
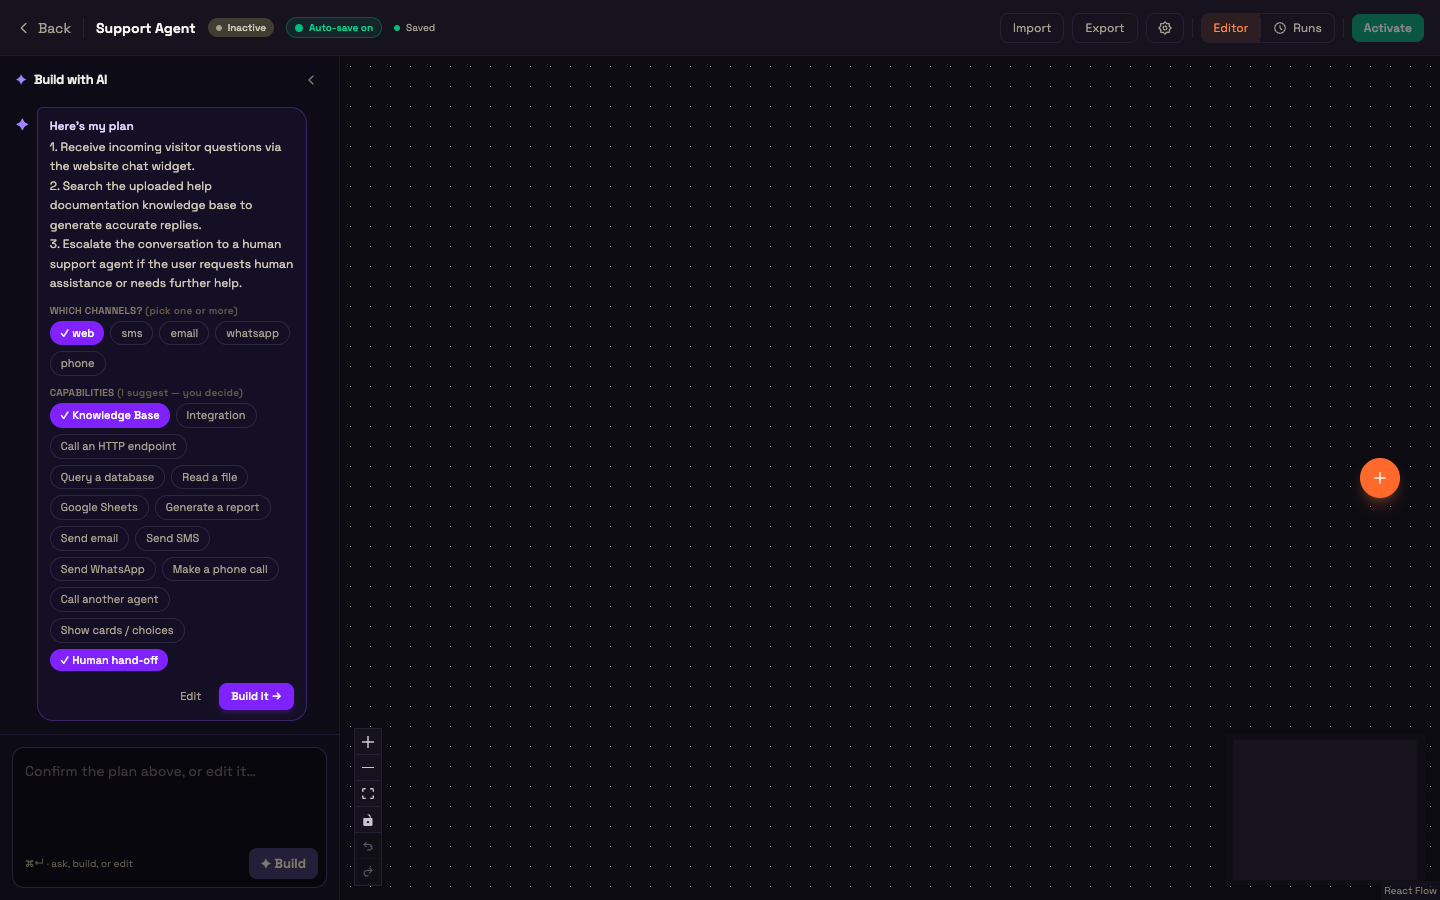
Adjust the chips, then click Build it →. The co-pilot builds a complete draft on the canvas — trigger, AI Agent, Personality, AI Model and the parts you chose — and then walks you through anything only you can provide, such as which Knowledge Base folder to answer from, right inside the chat. Nothing is activated for you: you review the draft and click Activate yourself.
Once the canvas has nodes, the same panel becomes Describe a change — ask it to "add WhatsApp" or "explain this" and it updates the canvas or answers.
Adding nodes by hand
The node picker
Click the orange + button on the right edge of the canvas to open the picker drawer. It has two levels: the first shows a card per category, the second lists the nodes in that category. Type in Search nodes… at any level to jump straight to a flat list of matches.
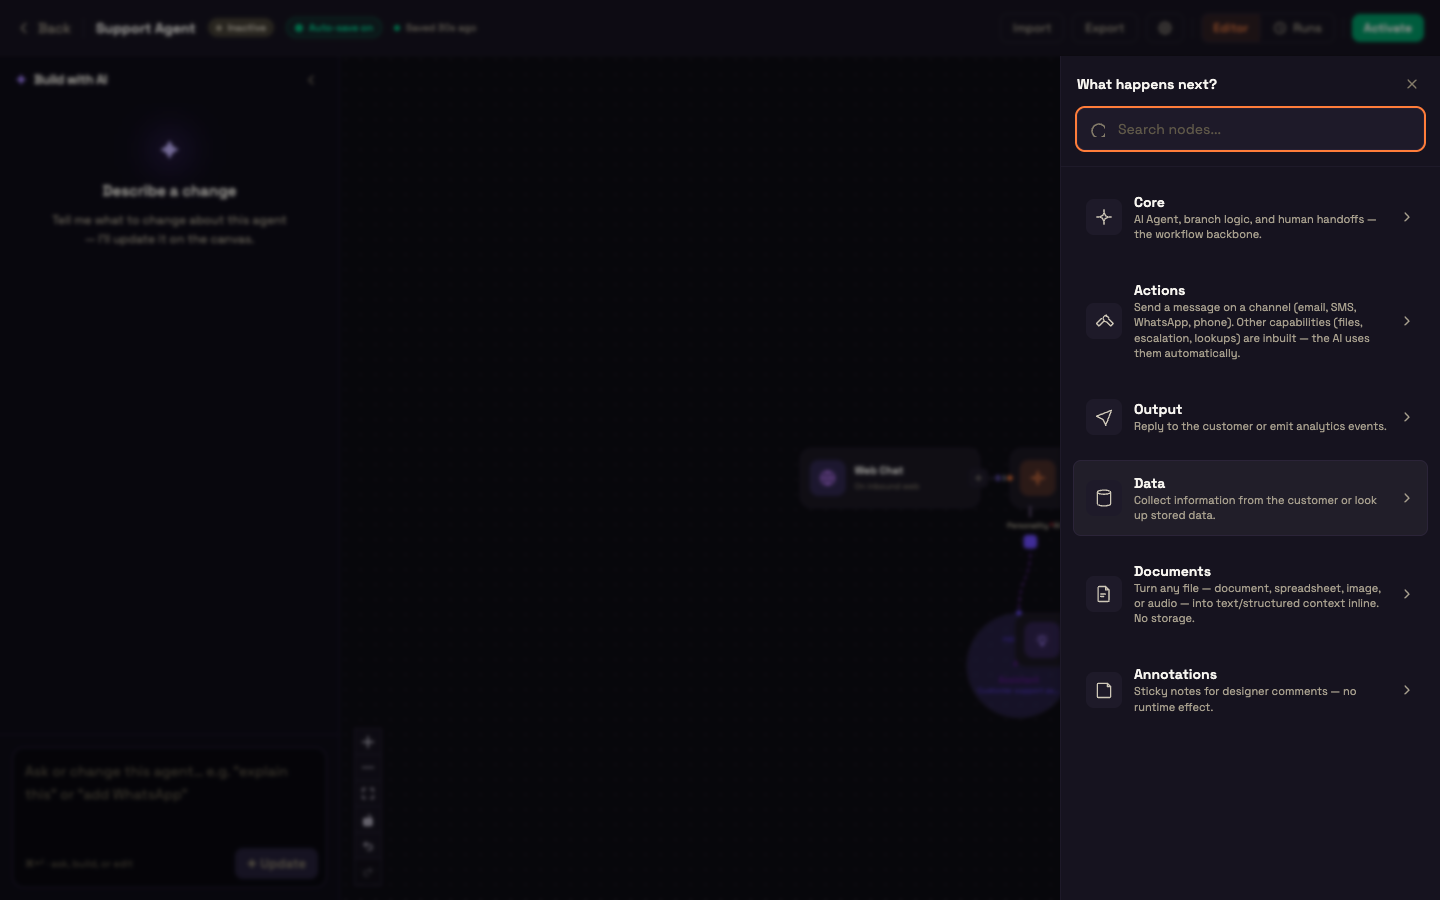
| Category | What it holds |
|---|---|
| Triggers | What starts the agent — Phone Call, SMS, Email, WhatsApp and Web Chat (under Channels), plus Webhook, Schedule, Internal Event, Knowledge Base, Folder Watch, Sub-Workflow and Manual Test. See Trigger Nodes. |
| Core | The backbone: AI Agent, Agent Team (a supervisor coordinating several worker agents), Condition (IF/ELSE), and Human Handoff. |
| Agent Parts | What an AI Agent is made of: Personality and AI Model (both required), Integration, Knowledge, Operator, and Action (run another agent). |
| Actions | Tools the agent can use, grouped as Messaging (Email Sender, SMS Sender, WhatsApp Sender, Phone Caller), Integrations (HTTP Request, Google Sheets), Databases (Postgres, MySQL, MongoDB), Documents (Extract Document, Detect Document Type and ready-made document types), Memory (Upload Document), and Operations (Hand off to Human). See Actions. |
| Output | Render View (turn data into a picker, cards or a checklist) and Track Event. |
| Agent process | The lightweight steps of an agent's Steps sub-flow — Ask agent and Tool. |
| Data | Collect Info, Look up Data, HTTP Request, and KB Index (index a previous step's output or a URL into a Knowledge Base folder). |
| Documents | Document Processing and its presets — Audio → Transcript, Spreadsheet → Text, File → Text (raw), Medical Report, Invoice / AP, Resume / ATS, Contract / Legal, and more. |
| Annotations | Sticky Note — a canvas-only comment. |
The picker only ever offers what can legally go where you are adding it. An empty canvas offers only Triggers. After a flow node it offers the next steps (no second trigger in a row). On an AI Agent's port it offers only the part that fits that port.
Every "+" on the canvas
Nodes can be added from several places, and each one opens a picker already filtered to valid choices:
- the orange + on the right edge of the canvas (the drawer above);
- the + on a node's right edge — What happens next?;
- the + that appears at the middle of a connection when you hover it — inserts a node between two nodes;
- the + under each of the AI Agent's ports — Add Personality, Add AI Model, Add Action, Add a step, and so on;
- the + on the AI Agent's left edge — What triggers this? — which adds another trigger feeding the same agent.
Connecting nodes
Every + is also a connection handle. Click it to open the picker, drag it onto another node to connect the two, or drag it onto empty canvas to add and connect a new node in one move. While you drag, the line turns green over a valid target and red over an invalid one.
Two rules are checked before any connection is made:
- The right kind of node. Flow nodes connect to flow nodes; each AI Agent port accepts only its own part (a Personality port accepts a Personality, the Action port accepts action tools, and so on).
- One-of-a-kind ports. An AI Agent takes exactly one Personality, one AI Model and at most one Operator — a second connection to those ports is refused.
One agent can have several triggers — for example Web Chat, WhatsApp and Email all feeding the same AI Agent — so you build the conversation logic once and serve every channel.
Working on the canvas
Node toolbar. Hover a node to see three small buttons above it: Execute step (opens the node's panel), Delete node, and More actions. More actions opens a menu with Open…, Execute step, Rename, Copy, Duplicate and Delete.
Keyboard shortcuts.
| Action | Shortcut |
|---|---|
| Undo | ⌘/Ctrl + Z (or the undo button in the bottom-left controls) |
| Redo | ⌘/Ctrl + Shift + Z or ⌘/Ctrl + Y (or the redo button) |
| Copy / Paste | ⌘/Ctrl + C / ⌘/Ctrl + V |
| Duplicate | ⌘/Ctrl + D |
| Delete selected nodes | Delete or Backspace |
Undo keeps the last 50 changes. Copies and duplicates keep the connections between the copied nodes and land slightly offset from the originals. All canvas shortcuts are switched off while a node's properties modal is open, so pressing Delete inside a text field never deletes the node behind it.
Zoom. The canvas opens fitted to the window. Zoom from 10% to 200% with the controls or your trackpad; the mini-map helps on large agents.
Validation — errors and warnings
The builder checks the agent continuously and shows the result in a banner under the toolbar:
- Validation errors — cannot publish (red). These block Activate, and the node at fault gets a red marker. Typical errors: no trigger, no AI Agent, an AI Agent without exactly one Personality and one AI Model, or a channel trigger with no business contact picked.
- Warnings — you can still publish (amber). Worth a look but not blocking — for example, an Email or WhatsApp trigger with no matching sender node, which means the agent will receive messages on that channel but not reply on it.
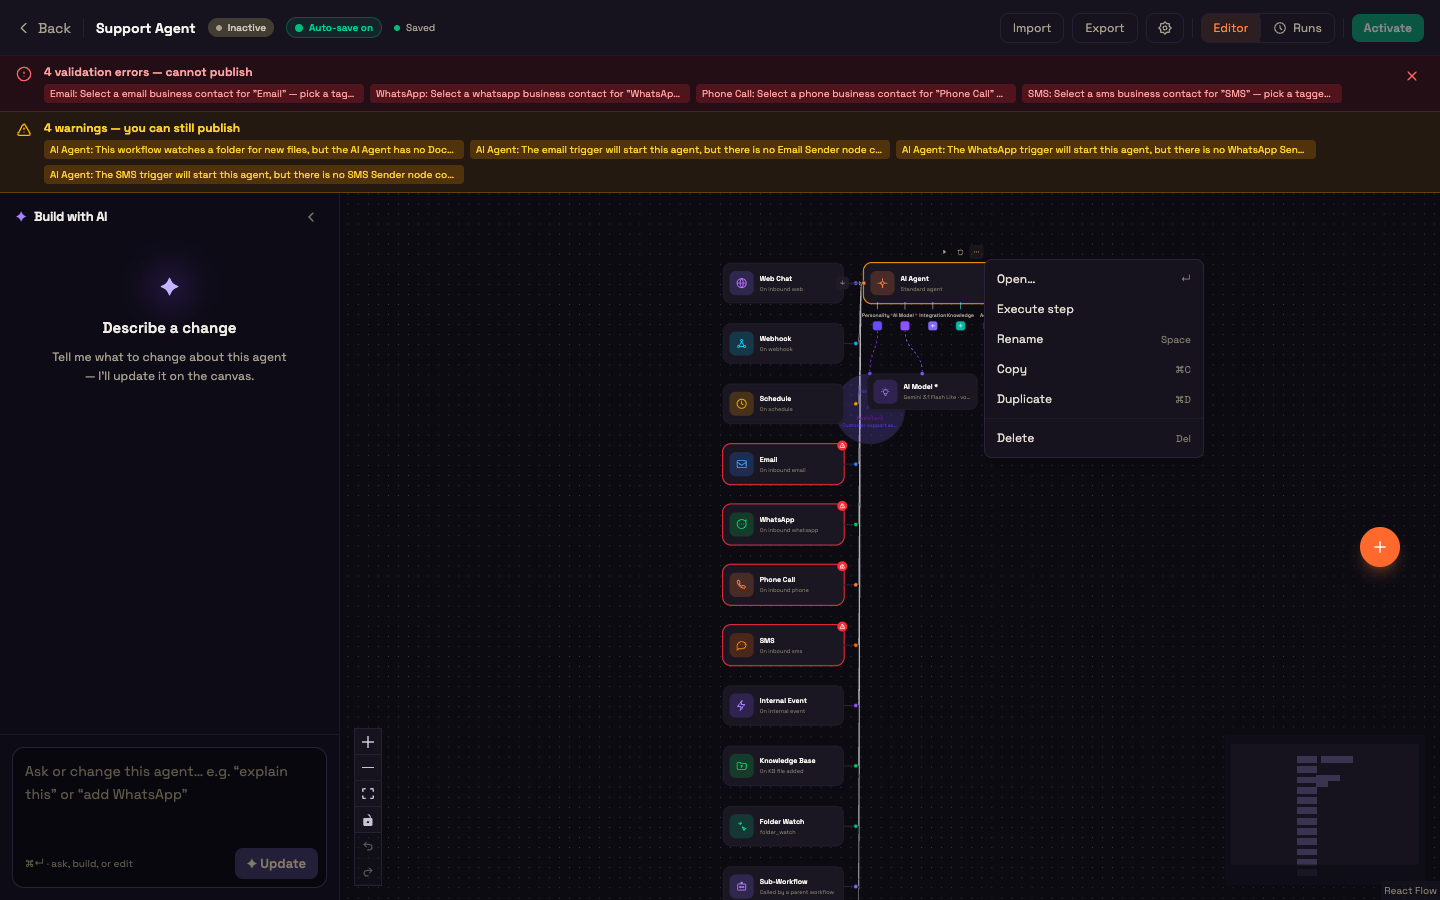
The ✕ on the banner hides it; the checks keep running.
The properties modal
Double-click a node (or choose Open…) to configure it in a centred three-pane modal: Input on the left (the variables available to this node), the node's configuration in the centre, and Output on the right (the variables it produces). The centre has Config, Settings and Notes tabs. Changes save automatically — there is no Save button — and Escape closes the modal. See The Properties Modal.
Variables — {{ }} expressions
Many fields accept {{ }} expressions that are filled in when the agent runs. The Input pane lists everything reachable from the node, grouped by where it comes from:
- Trigger — for example
{{ trigger.channel }},{{ trigger.customer_id }},{{ trigger.subject }}and{{ trigger.attachments[0].url }}; a Webhook adds the request body, query and headers; - Customer — the customer's phone, email and id;
- Each earlier node's outputs — for example the AI Agent's reply, or an HTTP Request's status and body.
Click ↵ next to a variable to insert it into the field you're editing, or the copy icon to copy its path. Fields with a {x} button open the same picker inline. Parts such as a Personality see the variables of the AI Agent they belong to.
Expressions only read values — they never run code — so a template or condition can't do anything unexpected.
The toolbar
Left side: Back, the agent name (click to rename — Enter saves, Escape cancels), a status pill — green Active (answering customers) or grey Inactive — an Auto-save on chip, and a save indicator (Saving…, Saved 5s ago).
Right side: Import (load an agent from a .json file), Export, the settings gear, the Editor / Runs switch, and the lifecycle button:
- an Inactive agent shows Activate. It's disabled while there are validation errors — hover it to see how many.
- an Active agent shows Deactivate, which takes it offline so it stops answering.
Activating — and what "live" means
Everything autosaves about a second and a half after you stop editing. Activate checks the agent and puts it live; from then on it answers on every trigger it has.
Edits to an active agent go live as they save
There is no separate "publish changes" step. Once an agent is Active, each saved edit is what your customers get on their next message. To make larger changes safely, Deactivate first, or build and test the change in a copy (Duplicate from the Agents list) and switch over when it's ready.
Agent settings
The gear in the toolbar opens Agent settings with two tabs:
- Compute — switch between Standard (shared), Premium and Dedicated. Dedicated gives the agent its own machine, which is prepared when you apply the change (or when you activate) — the status pill shows Provisioning until it's ready.
- Reusable agent — Save this as reusable agent turns the canvas into a template in the Agent Marketplace, with a name, description, category and tags. Business contacts and provider keys are removed so the template is portable; the persona, model choices, integrations, knowledge references and all other settings are kept.
Testing before you go live
- Web Chat live preview. Open a Web Chat trigger and click Live preview. A working chat widget opens beside the settings and runs your current draft — no activation needed — so you can chat with the agent, try voice, and upload files. Test as lets you pretend to be a known customer by phone, email or your own customer id. Every change to the widget settings shows in the preview straight away. See Trigger Nodes.
- Manual Test trigger. Add a Manual Test trigger, paste a sample payload, and click Execute to run the agent once; the result appears in the Output pane.
- Schedule — Run now. A Schedule trigger has a Run now button that fires one run immediately instead of waiting for the next scheduled time.
A structurally incomplete draft still fails with a clear error rather than silently doing nothing.
A worked example — Asha builds an FAQ agent for Acme Support
Setup: Asha clicks New Agent, names it "Support Agent", and in Build with AI picks the FAQ bot recipe. The plan card suggests the web channel and the Knowledge Base capability; she also ticks whatsapp and clicks Build it →. When the co-pilot asks which folder to answer from, she picks "Help Center".
Action: She opens the Web Chat trigger, clicks Live preview, and asks "What are your support hours?". The draft answers from the Help Center folder. The validation banner shows one error — the WhatsApp trigger has no business contact — so she opens it and picks Acme Support's WhatsApp number. The banner clears and she clicks Activate.
Result: A customer named Priya messages Acme Support on WhatsApp: "What are your support hours?" The WhatsApp trigger fires, the AI Agent answers from the same folder, and Priya gets her reply.
What just happened: Build with AI drafted the whole agent; the live preview let Asha test it without going live; validation caught the missing WhatsApp number before any customer could hit it; and one AI Agent now serves both web chat and WhatsApp.
Replaying past runs
Click Runs in the toolbar to see every past run of the agent. Each run replays on a read-only copy of the canvas, with every node coloured by how it did, and a bottom panel with Chat, Logs, Diagram, Tokens and Usage tabs.
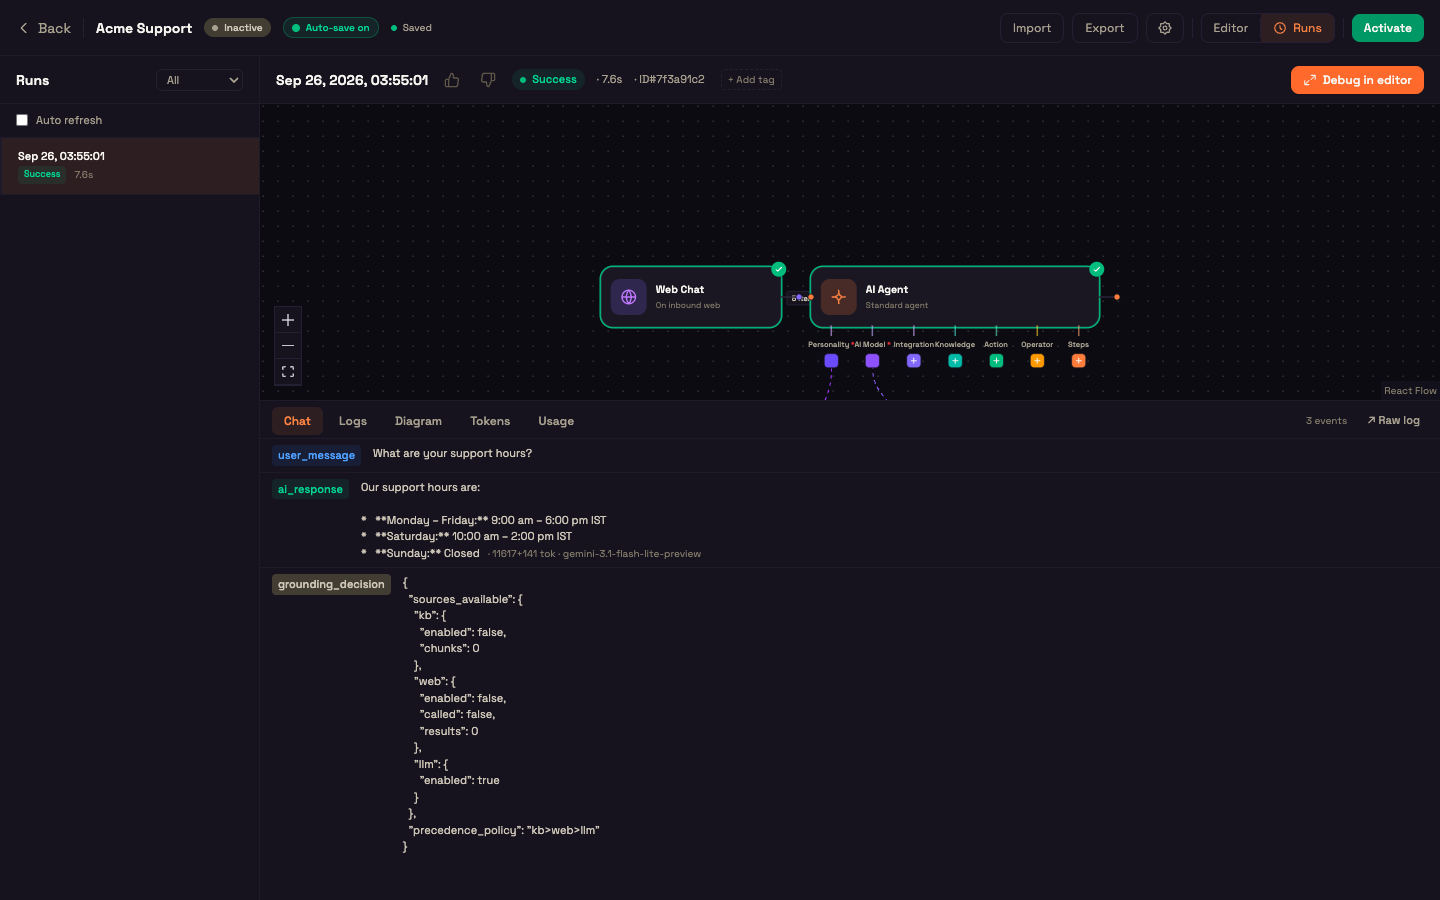
See Runs & Executions for the full tour.
What's next
- AI Agent Node — configure the centre of every agent.
- Trigger Nodes — every way an agent can start.
- The Properties Modal — Input / Config / Output, Settings and Notes.
- Condition (IF/ELSE) — branch a flow.
- Agent Marketplace — start from a ready-made template.
- Runs & Executions — debug past runs.