Connections (setup guide)
Asha has built her agents for Acme Support. The last step is connecting the accounts those agents use to send and receive messages — her Plivo number, her support mailbox, her Google Sheet. That's what Connections is for.
Go to Admin → Connections (/credentials). Everything you connect here is your own account with that provider: your agents use it on your behalf, and your keys stay private to your workspace.
The AI is already included
You don't connect an AI model here. The language models, voice, file storage, knowledge-base search and web-voice infrastructure your agents run on are included and managed by Perfox — there's nothing to configure and no key to paste. You choose a model per agent on its Chat Model sub-node, and usage is paid from your credits.
How the page is laid out
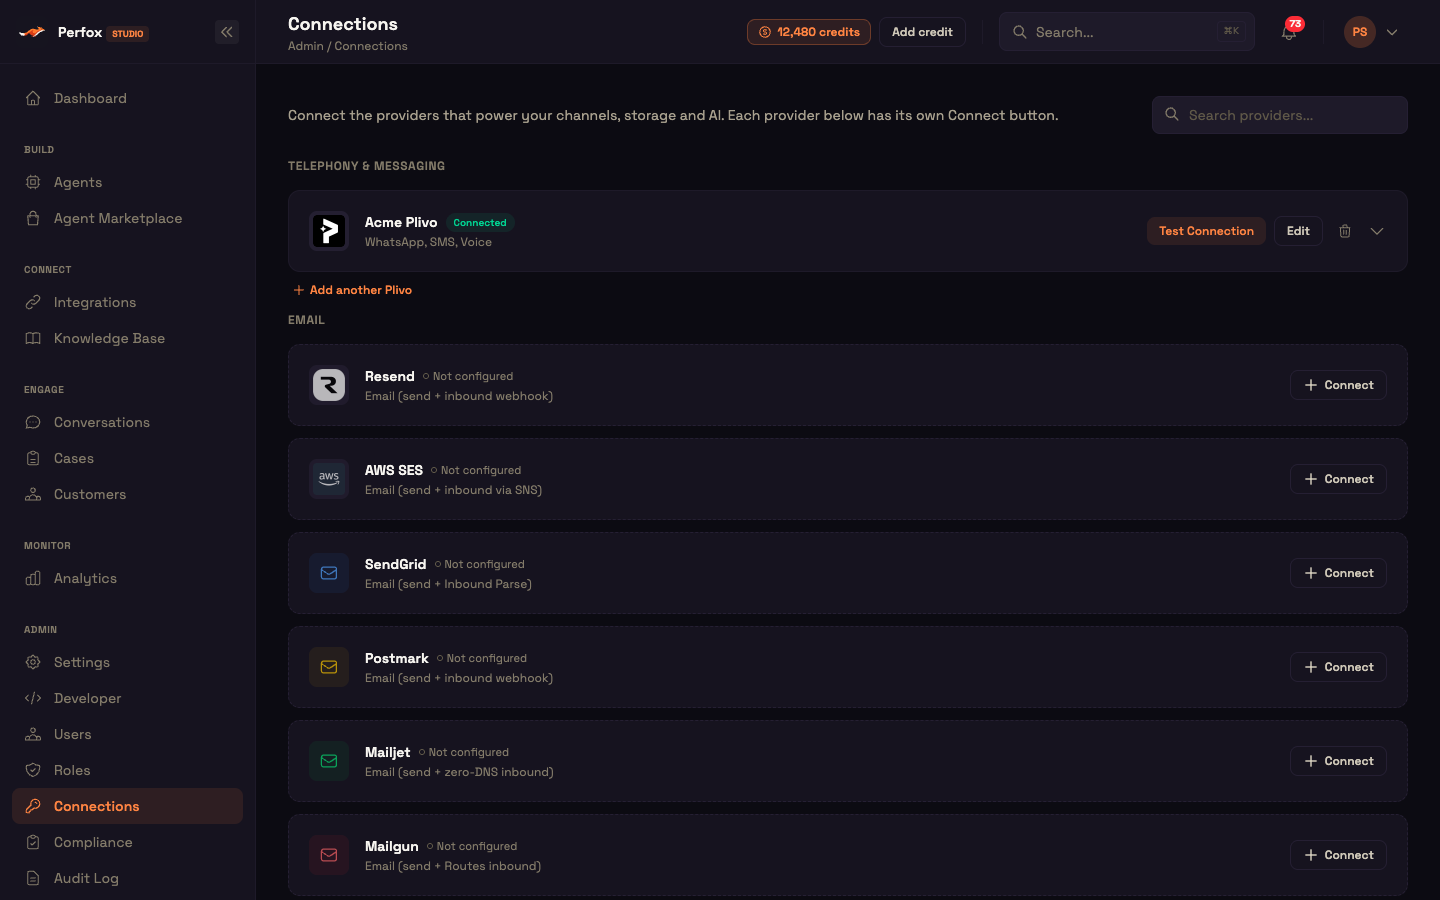
Every provider you can connect has its own slot, grouped into sections:
| Section | Providers |
|---|---|
| Telephony & Messaging | Plivo (WhatsApp, SMS, Voice) |
| Resend, AWS SES, SendGrid, Postmark, Mailjet, Mailgun, Gmail / Google Workspace, SMTP / IMAP, Microsoft 365 (Email) | |
| Storage | AWS S3, Microsoft 365 (OneDrive / SharePoint), Google Drive — knowledge-base sources |
| Databases | PostgreSQL, MySQL (MySQL / MariaDB), MongoDB — your own database, queried by an agent tool |
| Integrations | Google Sheets |
The Search providers... box filters slots as you type (by provider name, type or description); a section with no matches disappears.
Each slot shows its state:
- Not connected — a dashed row with "○ Not configured" and a Connect button.
- Connected — one card per connection, plus an Add another <provider> link. You can connect several accounts of the same provider; they stack in the slot.
Clicking Connect opens a form already set to that provider — there's no provider drop-down to mis-pick.
Status badges
| Badge | Colour | Meaning |
|---|---|---|
| Connected | green | The last Test Connection succeeded |
| Error | red | The last Test Connection failed |
| Not configured | grey | Required fields are missing |
Microsoft 365 cards also show their access mode — Delegated or App-only.
Card actions
Each connection card has these actions in its header:
- Test Connection — a real, live check against the provider (see below).
- Edit (or Configure if it was never fully set up) — change the name, description and provider fields. Plivo edits inline in the expanded card instead — see Plivo.
- Delete (trash icon) — asks for confirmation: "This action cannot be undone. Any workflows or MCP servers referencing this credential will lose their connection."
- Expand (chevron) — shows the saved fields, webhook URLs, where the connection is used, and Last tested.
OAuth providers add a Connect Google, Connect Microsoft or Reconnect button on the card, so you can re-authorise in place without deleting the connection — agents wired to it stay wired.
Test Connection
- Checks the required fields — if any are missing it fails straight away with "Missing required fields: …".
- Calls the provider — for example a Plivo account check, a mailbox login, or a database query of
SELECT 1. - Shows the result — a green "✓ Connected" or red "✕ Connection failed" banner with the provider's own message, and updates the badge and Last tested date.
Some providers (Microsoft 365, several email providers) also return a checklist — one ✓ or ✕ line per permission or capability — so you can see exactly what's missing.
The Connect form
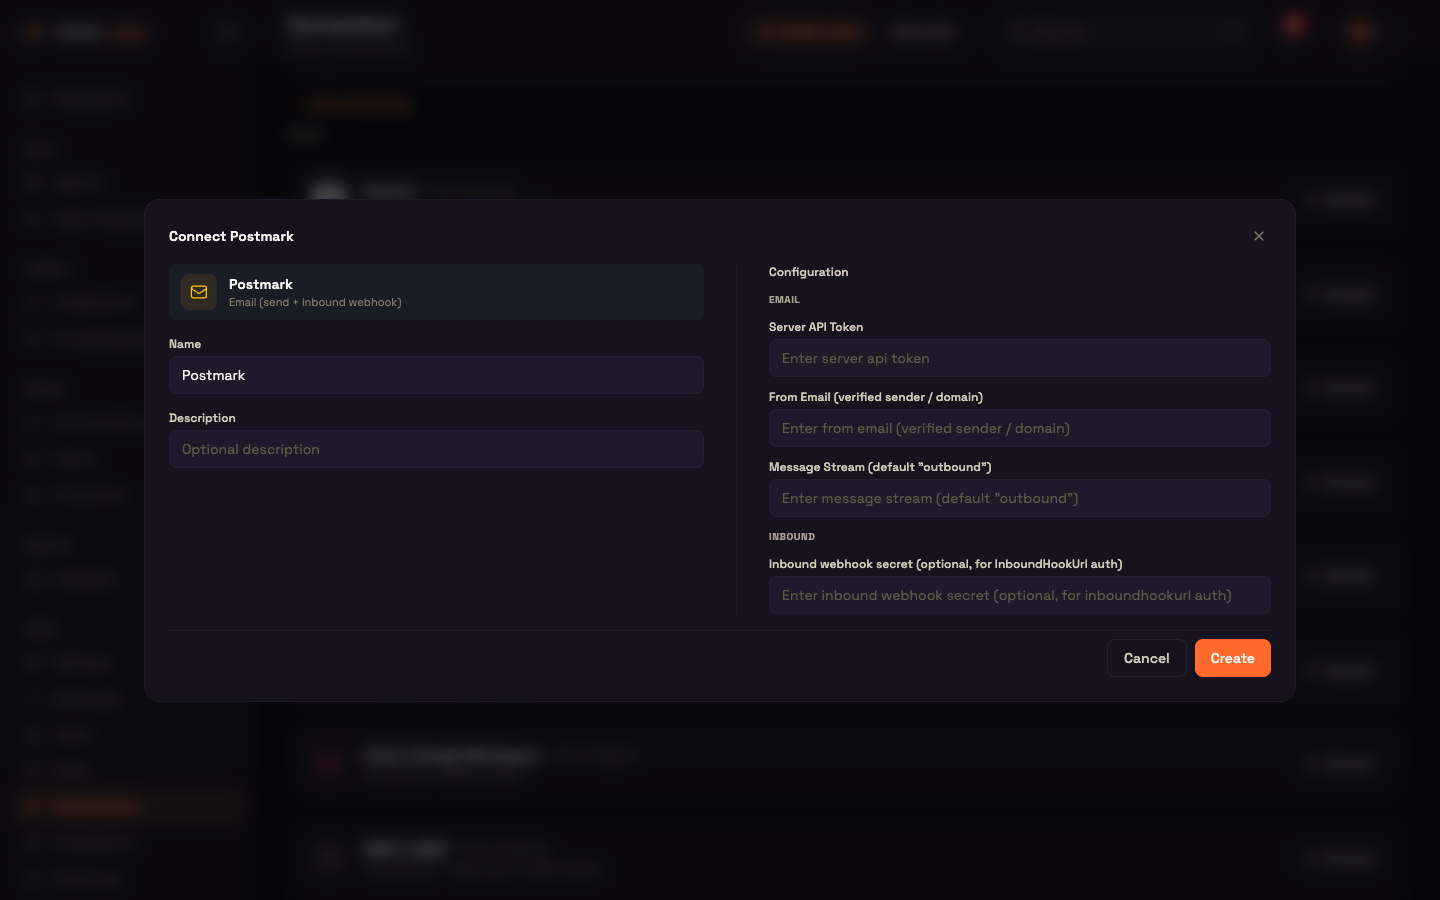
- The title reads Connect <provider>, with the provider's logo and description.
- Name (pre-filled with the provider name) and an optional Description on the left; the provider's own fields on the right, grouped where it helps (for example Email and Inbound). Secret fields are masked.
- Create saves the connection. Then open the card and click Test Connection.
OAuth providers use a different button:
| Provider | Button |
|---|---|
| Google Sheets, Gmail / Google Workspace | Save & Connect Google |
| Microsoft 365 / Microsoft 365 (Email) — Delegated | Save & Connect Microsoft |
| Microsoft 365 / Microsoft 365 (Email) — App-only | Save |
Expanded card details
- Saved values are shown read-only. Secrets are masked with a Reveal / Hide toggle.
- Webhook URLs to paste into your provider's console — for providers that call you back, each URL is built for your workspace (
https://<your-workspace>-api.perfox.ai/...) with an HTTP method label and a Copy button. For Plivo:
| Channel | Purpose | Path |
|---|---|---|
| Phone | Answer URL | /plivo/inbound-answer |
| SMS | Message URL (inbound SMS) | /webhooks/sms/plivo |
| SMS | Delivery / Status URL | /webhooks/sms/plivo/status |
| Inbound message URL | /webhooks/whatsapp/plivo | |
| Delivery Reports URL | /webhooks/whatsapp/plivo/status |
- Where it's used — see Usage and detach.
Plivo inline editor
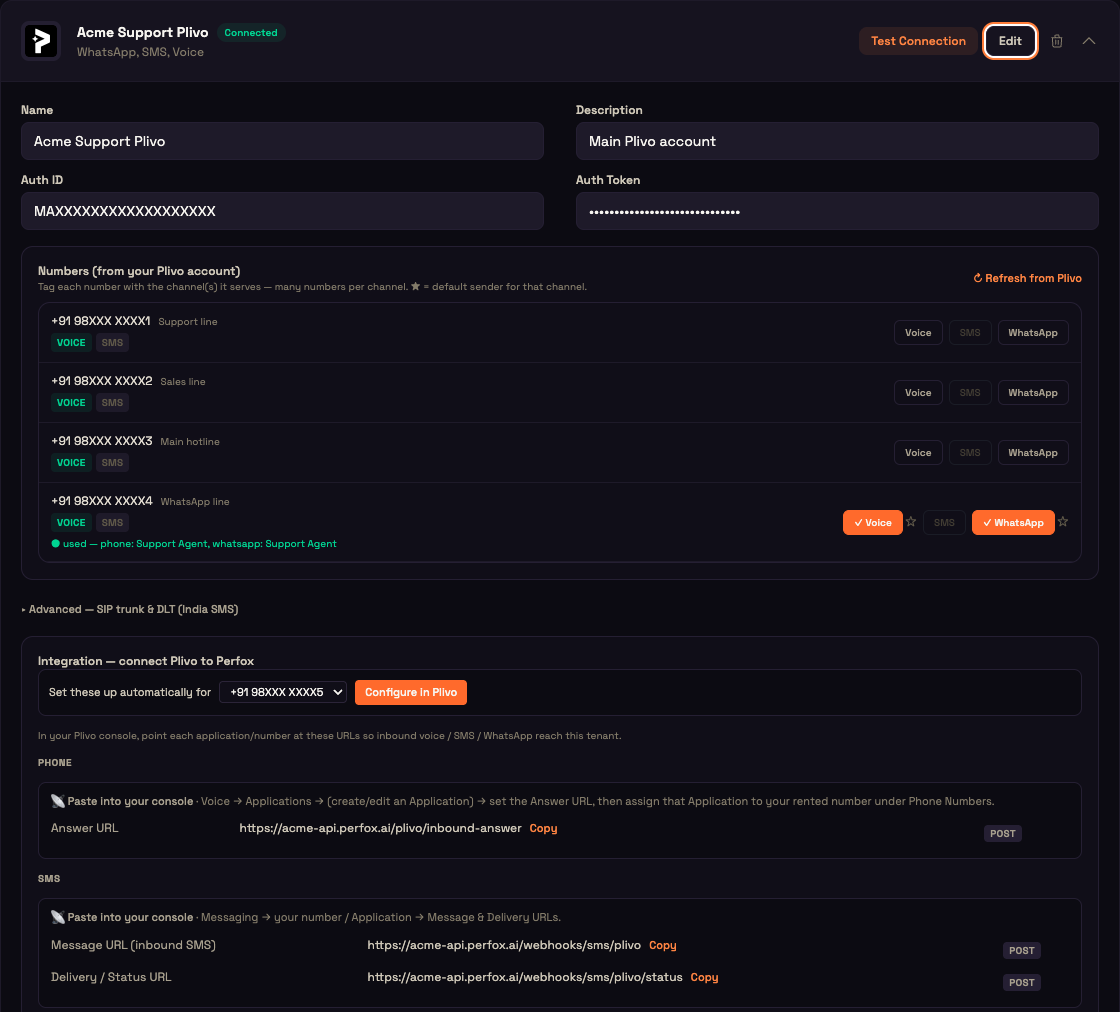
Plivo is edited directly in its expanded card (its Edit button just expands it):
- Name / Description and Auth ID / Auth Token (secrets behind Reveal).
- Advanced — SIP Domain / Username / Password and India SMS DLT fields (DLT Entity ID, Template ID, Template Category).
- Number inventory — the numbers on your Plivo account load automatically when you open the card. Tag each number with the channels it serves — Voice, SMS, WhatsApp (one number can serve several) — and mark one primary per channel as the default "from" number. Tag changes save automatically.
- Configure in Plivo — pick a number and Perfox sets up the Plivo application and points the number at it for you. If the number is still bound to something else in Plivo (often a PHLO flow), you're told to change it in the Plivo console.
- The per-channel webhook URLs, and one Save changes button for the rest of the form.
The tagged inventory is what the number pickers in your agents offer. See Plivo for the full walkthrough.
Connecting OAuth providers
Google Sheets and Gmail (your own Google app)
Gmail connection is temporarily unavailable
Google Sheets works as described below. Connecting Gmail / Google Workspace from the Connections page isn't working right now — we're fixing it. In the meantime, connect your mailbox with another email provider, such as SMTP / IMAP.
Google Sheets (and Gmail) connect through your own Google Cloud OAuth app. The form walks you through it:
- In Google Cloud Console, create or pick a project.
- Enable the APIs the form lists (for Sheets: Google Sheets API and Google Drive API — skipping one causes a "API … is disabled" error).
- Configure the OAuth consent screen, add the scopes shown in the copyable block, and add yourself as a test user.
- Create an OAuth client ID (Web application) and register the exact Redirect URI shown in the form.
- Paste the Client ID and Client Secret, then click Save & Connect Google.
Google asks you to approve access and then returns you to Connections with the card connected. Reconnect re-authorises the same connection later (for expired or revoked access) without breaking any agent that uses it. See Google Sheets.
Microsoft 365 (your own Entra app)
There are two Microsoft 365 slots, which can share the same Entra app:
- Microsoft 365 under Storage — OneDrive / SharePoint knowledge-base sources.
- Microsoft 365 (Email) under Email — send and receive mail through Microsoft Graph. See Email Providers.
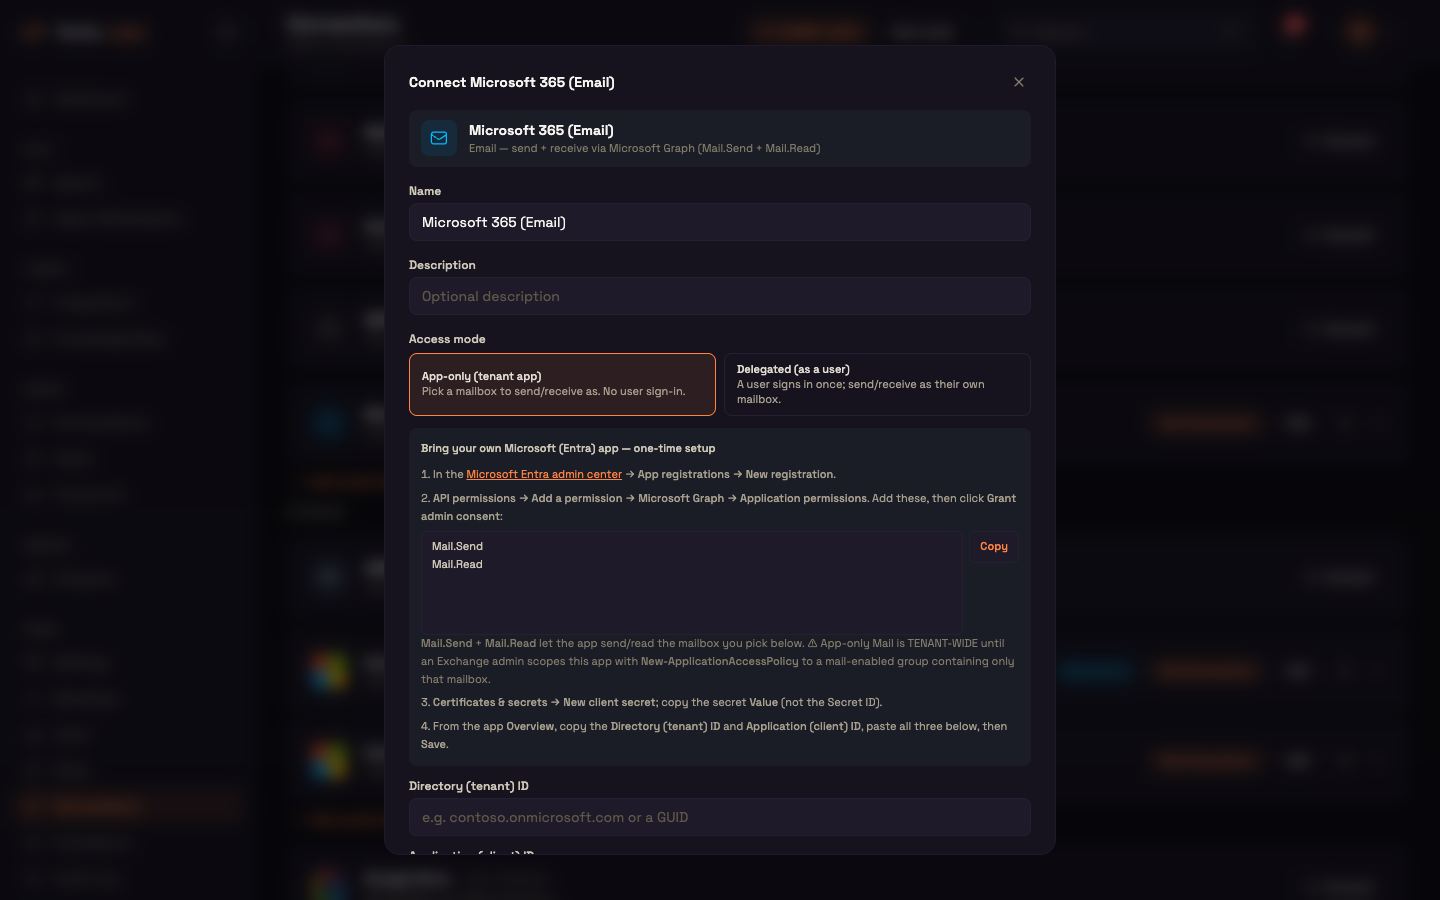
Choose an Access mode:
| Mode | How it works | Button |
|---|---|---|
| App-only (tenant app) | No user sign-in. Storage: pick a user by email later on the Knowledge Base page. Email: enter the mailbox to send/receive as. | Save (checked by requesting a token) |
| Delegated (as a user) | A user signs in once; the connection acts as that user (for storage, including files shared with them). | Save & Connect Microsoft (opens a sign-in window) |
One-time setup, as the form describes: register an app in the Microsoft Entra admin center; for Delegated, add the Redirect URI shown in the form under Authentication → Web; add the Microsoft Graph permissions from the copyable block and click Grant admin consent; create a client secret; then paste the Directory (tenant) ID, Application (client) ID and Client Secret.
| Slot | Mode | Graph permissions |
|---|---|---|
| Microsoft 365 (storage) | Delegated | offline_access, User.Read, Files.Read.All, Sites.Read.All, Group.Read.All |
| Microsoft 365 (storage) | App-only | Files.Read.All, Sites.Read.All, Group.Read.All, User.Read.All |
| Microsoft 365 (Email) | Delegated | offline_access, User.Read, Mail.Send, Mail.Read |
| Microsoft 365 (Email) | App-only | Mail.Send, Mail.Read |
App-only mail access
App-only Mail.Send / Mail.Read reach every mailbox in your Microsoft organisation until an Exchange admin restricts the app with an application access policy to a group containing only the mailbox you use.
Usage and detach
The expanded card shows where a connection is used, so you know the impact before you rotate or delete it:
- Numbers — each phone / SMS / WhatsApp number shows whether it's assigned to an agent (with a link), not assigned, or used as the outbound caller ID.
- Other connections — the agent that uses it ("Used by workflow: …").
- Assigned numbers have a Detach button. Its confirmation shows the current binding and what happens after you detach — for example inbound calls to that number are no longer answered, or messages sit unhandled — and links to the agent.
- After detaching, publish the affected agent again for the change to take effect.
Before you rotate a key
Check the usage list first, so you know which agents to re-test afterwards.
What isn't on this page
- AI models, voice, file storage, knowledge-base search, web voice — included and managed by Perfox.
- MCP server connections — set up on Integrations, not here.
Next steps
- Plivo (SMS / WhatsApp / Voice) — number tagging, one-click setup and DLT fields
- Email Providers — choose and set up your email provider
- Database Connectors — let an agent query your PostgreSQL, MySQL or MongoDB database
- Google Sheets — the full Google app walkthrough
- Provider Matrix — every provider side by side